
| Workshop | Empennage | Wings | Fuselage | Contact |
| <-- October 2013 | December 2013 --> |
Chronological Updates, November, 2013
6 Nov 2013
Prior to attaching the left wing leading edge sub-assembly to the main body, I wanted to finalize the wiring harness serving the stall warning switch and auxiliary wiring connector found in the inboard bay of the leading edge sub-assembly. I chose to wire the 9-pin auxiliary connector with three shielded pairs of 22awg wire so that if I needed to run video from this area to the fuselage I could do so.
I haven't decided yet if I will try to run this harness through the holes in the fuel tank's z-attach brackets to the forward part of the wing root or pass the harness through the spar and have it enter the main wiring conduit to the aft wing root. Regardless, the left leading edge sub-assembly is complete as per the plans and is ready for assembly onto the main wing body.
7 Nov 2013
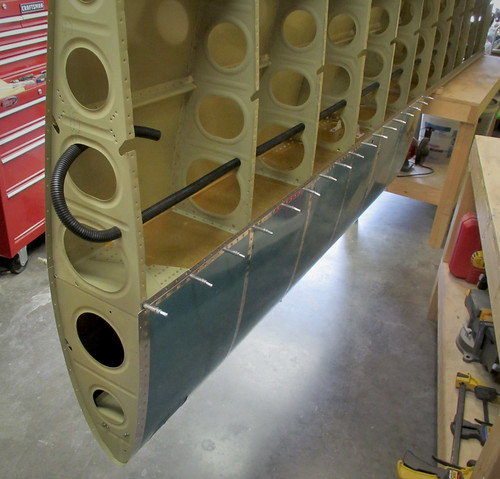
I was dreading putting the wiring conduit into the left main wing body because it had been such a pain on the right wing. However, when I set about pulling it through the holes in the ribs, I found that it was actually quite easy to get through rather quickly this time. No idea what I was doing wrong this time, but with some effort I was able to pull significant lengths of conduit through each hole in a single pull. I did manage to put a few good-sized blisters into my hand doing this, so my recommendation is to wear gloves. The only hard part is getting the narrow wing-walk bays pulled, since there is no room there to pull parallel to the conduit. I probably spent more time getting the conduit through those three bays than I did getting the whole rest of the wing rigged with conduit. No photos.
16 Nov 2013
This morning I got the left wing's leading edge assembly attached to the main spar. I was able to get all of the rib rivets done solo.
Will came over in the afternoon and we made quick work of the 82 top-side skin rivets attaching the leading edge to the main wing spar.
Next, we tackled the right wing's inboard bottom skin. I clecoed the aft half of the bottom skin into place, then tied some safety wire between the forward edge of the skin and the flap hangers to pull it up and away from the wing body. This allowed will to get an arm into the inside of the wing and buck rivets at the aft end of the wing.
The farthest-aft rivets were a real pain (for the bucker, anyway; driving them is easy). The plans indicate that we should start at the center of the aft spar and work forward and out to both sides of the skin. I wanted to get the entire aft half of the skin done before moving on to the forward half so that I could keep the safety wire bend in place. However, when we got to the point of having to get an arm inbetween the wing walk ribs we found that neither of us was able to do it; our forearms wouldn't fit in the narrow bays. We resolved to get Will's daughter, who is working on her A&P certification and loves sheet metal work, to come by next week sometime and help.
17 Nov 2013
Did a quick stint today with the squeezer and finished off all of the rivets attaching the bottom skin of the leading edge on the left wing to the spar. This completes the attachment of the leading edge to the wing. Just 82 quick rivets; no photos.
19 Nov 2013
The left wing is just about ready to be moved into the garage and placed on the wing cart, an event which will need to occur prior to attaching the fuel tank. The one remaining small task will be to route the wiring harness from the inboard bay of the leading edge to the wing root. I had planned on running the wire through a series of snap bushings in the Z-attach brackets at the aft end of the fuel tank, but it turns out that the harness is too thick to fit through these holes. I don't want to enlarge these holes and risk weakening the support for the tank. Also, once I run wires through the fuel tank structure between the wing root and the leading edge, it pretty much means the tank is not removable without clipping the wiring harness.
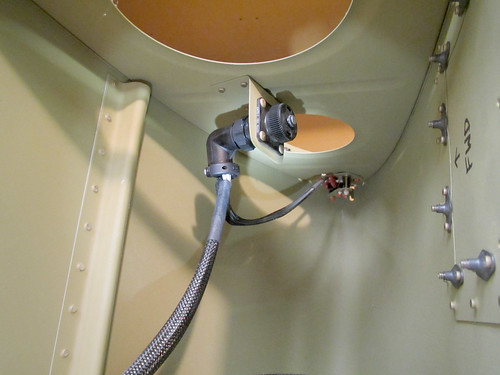
SO, instead I resolved to run the wire harness through the spar and into the main wiring conduit. To do this, I did have to widen the hole in the spar through which the stall warning switch wires would usually run in order to accomodate the three shielded pairs of 22AWG and larger snap bushing. The resulting hole was 1/2" in diameter. I consulted with my EAA technical advisor on this modification and he agreed it was acceptable, despite being in the main spar of the wing.
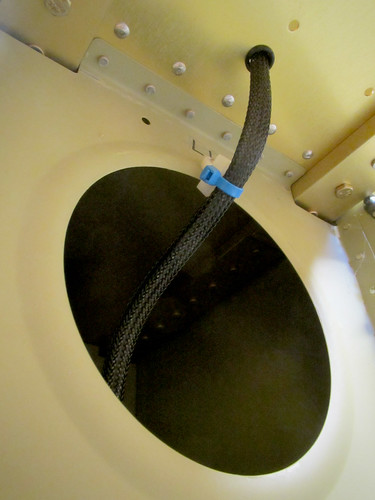
To negotiate the passage from the inboard bay of the leading edge to the narrow gap between the fuel tank and leading edge, I installed a plastic lightening hole wire passthrough with a single rivet onto the leading edge rib (the white thing in the image, above), and zip-tied the cable bundle into it. This will keep the harness from abrading on the edge of the lightening hole.
My only concern now is that the increased diameter of the spar hole and snap bushing may actually impinge on the outboard-most Z-attach bracket from the fuel tank. I haven't done the measurement yet but at most it will just be a few millimeters. I may have to grind an arc into the center of the outboard edge of the bracket or file a flat onto the snap bushing's outer edge or something.
26 Nov 2013
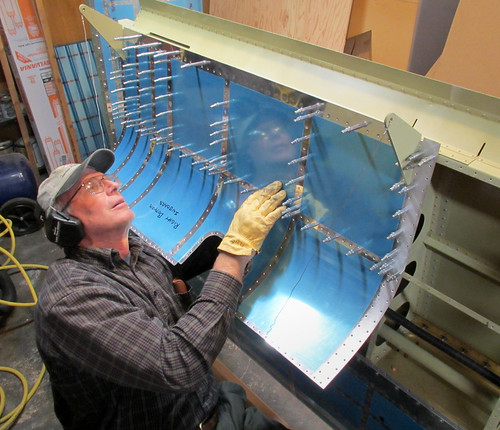
Will and his daughter April came by this evening and the three of us set to work getting the really awkward rivets in the wing walk region of the bottom inboard skin on the right wing completed.
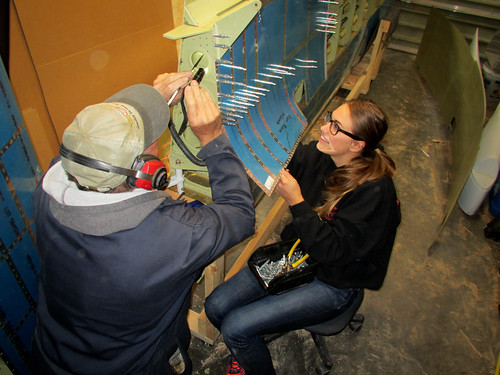
Will was the official rivet inspector, I handled the rivet gun, and April had the thankless job of getting the bucking bar aligned with the back of the rivets, blind, in a very confined space. We did pretty well, with only a couple rivets needing to be drilled out. The entire aft half of the inboard skin is now complete, leaving the somewhat less-constrained forward half remaining. I told April that she would have to fly back out from New Jersey when I got to this point on the left wing. I have no idea how the people who have done this section solo have managed.
Prior to attaching the left wing leading edge sub-assembly to the main body, I wanted to finalize the wiring harness serving the stall warning switch and auxiliary wiring connector found in the inboard bay of the leading edge sub-assembly. I chose to wire the 9-pin auxiliary connector with three shielded pairs of 22awg wire so that if I needed to run video from this area to the fuselage I could do so.
I haven't decided yet if I will try to run this harness through the holes in the fuel tank's z-attach brackets to the forward part of the wing root or pass the harness through the spar and have it enter the main wiring conduit to the aft wing root. Regardless, the left leading edge sub-assembly is complete as per the plans and is ready for assembly onto the main wing body.
7 Nov 2013
I was dreading putting the wiring conduit into the left main wing body because it had been such a pain on the right wing. However, when I set about pulling it through the holes in the ribs, I found that it was actually quite easy to get through rather quickly this time. No idea what I was doing wrong this time, but with some effort I was able to pull significant lengths of conduit through each hole in a single pull. I did manage to put a few good-sized blisters into my hand doing this, so my recommendation is to wear gloves. The only hard part is getting the narrow wing-walk bays pulled, since there is no room there to pull parallel to the conduit. I probably spent more time getting the conduit through those three bays than I did getting the whole rest of the wing rigged with conduit. No photos.
16 Nov 2013
This morning I got the left wing's leading edge assembly attached to the main spar. I was able to get all of the rib rivets done solo.
Will came over in the afternoon and we made quick work of the 82 top-side skin rivets attaching the leading edge to the main wing spar.
Next, we tackled the right wing's inboard bottom skin. I clecoed the aft half of the bottom skin into place, then tied some safety wire between the forward edge of the skin and the flap hangers to pull it up and away from the wing body. This allowed will to get an arm into the inside of the wing and buck rivets at the aft end of the wing.
The farthest-aft rivets were a real pain (for the bucker, anyway; driving them is easy). The plans indicate that we should start at the center of the aft spar and work forward and out to both sides of the skin. I wanted to get the entire aft half of the skin done before moving on to the forward half so that I could keep the safety wire bend in place. However, when we got to the point of having to get an arm inbetween the wing walk ribs we found that neither of us was able to do it; our forearms wouldn't fit in the narrow bays. We resolved to get Will's daughter, who is working on her A&P certification and loves sheet metal work, to come by next week sometime and help.
17 Nov 2013
Did a quick stint today with the squeezer and finished off all of the rivets attaching the bottom skin of the leading edge on the left wing to the spar. This completes the attachment of the leading edge to the wing. Just 82 quick rivets; no photos.
19 Nov 2013
The left wing is just about ready to be moved into the garage and placed on the wing cart, an event which will need to occur prior to attaching the fuel tank. The one remaining small task will be to route the wiring harness from the inboard bay of the leading edge to the wing root. I had planned on running the wire through a series of snap bushings in the Z-attach brackets at the aft end of the fuel tank, but it turns out that the harness is too thick to fit through these holes. I don't want to enlarge these holes and risk weakening the support for the tank. Also, once I run wires through the fuel tank structure between the wing root and the leading edge, it pretty much means the tank is not removable without clipping the wiring harness.
SO, instead I resolved to run the wire harness through the spar and into the main wiring conduit. To do this, I did have to widen the hole in the spar through which the stall warning switch wires would usually run in order to accomodate the three shielded pairs of 22AWG and larger snap bushing. The resulting hole was 1/2" in diameter. I consulted with my EAA technical advisor on this modification and he agreed it was acceptable, despite being in the main spar of the wing.
To negotiate the passage from the inboard bay of the leading edge to the narrow gap between the fuel tank and leading edge, I installed a plastic lightening hole wire passthrough with a single rivet onto the leading edge rib (the white thing in the image, above), and zip-tied the cable bundle into it. This will keep the harness from abrading on the edge of the lightening hole.
My only concern now is that the increased diameter of the spar hole and snap bushing may actually impinge on the outboard-most Z-attach bracket from the fuel tank. I haven't done the measurement yet but at most it will just be a few millimeters. I may have to grind an arc into the center of the outboard edge of the bracket or file a flat onto the snap bushing's outer edge or something.
26 Nov 2013
Will and his daughter April came by this evening and the three of us set to work getting the really awkward rivets in the wing walk region of the bottom inboard skin on the right wing completed.
Will was the official rivet inspector, I handled the rivet gun, and April had the thankless job of getting the bucking bar aligned with the back of the rivets, blind, in a very confined space. We did pretty well, with only a couple rivets needing to be drilled out. The entire aft half of the inboard skin is now complete, leaving the somewhat less-constrained forward half remaining. I told April that she would have to fly back out from New Jersey when I got to this point on the left wing. I have no idea how the people who have done this section solo have managed.
| <-- October 2013 | December 2013 --> |