
| Workshop | Empennage | Wings | Fuselage | Contact |
| <-- March 2013 | May 2013 --> |
Chronological Updates, April, 2013
1 Apr 2013
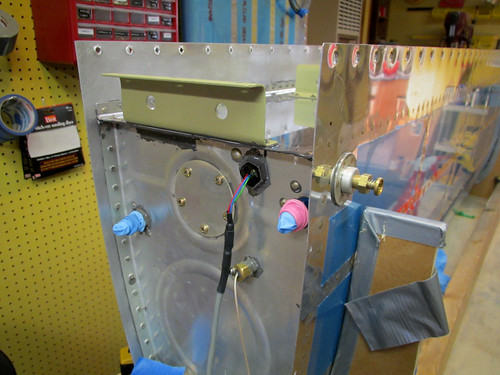
Yesterday and today I finally put the aft baffle in place on the right fuel tank.
I did one last inspection of the interior surfaces, then gave everything a good wipe-down with acetone to get all the fingerprints, dust, cat hair, etc. out of the tank. Then I masked off the bits of skin that extend aft of the baffle, mixed up 40 grams of sealant, and went to work covering all of the rib aft flanges and the skin/baffle contact area.
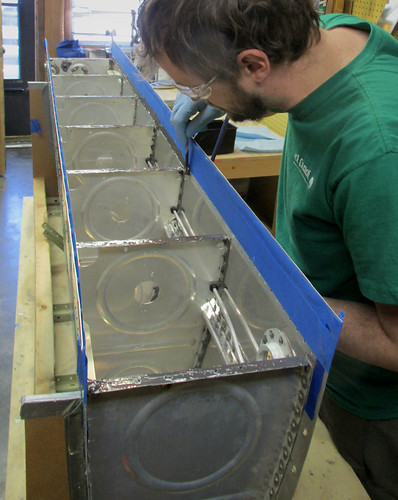
With the sealant in place, I lowered the baffle into position and went to work adding the huge number of clecos it takes to fill every hole. The first part to be riveted was the middle five Z-brackets, which get pop-riveted in place with sealed-end blind rivets. Then, I started the seemingly endless task of riveting the skin to the baffle. Here's a shot after just 15 skin/baffle rivets:
I managed to get one side of the skin/baffle rivets done before I ran out of sealant and had to take a break. I returned this afternoon to finish off the two remaining Z-brackets and the other side of the skin/baffle rivets. This took less than 10g of additional sealant.
Now the right tank is essentially complete, structurally speaking. Once the sealant cures, I still have to pressure test it and countersink/rivet the 20 pilot holes. Then the right and left tank will be in the same state. When they're both pressure tested to my satisfaction, I'll prime the outer surfaces that aren't skin, rivet on the attach bracket spacers, and the fuel tanks will be done done.
24 Apr 2013
This month has been mostly consumed with waiting for sealant to cure on the fuel tanks. Between the aft baffle of the right tank and the second leak in the left tank, both tanks were out of commission curing for the last three weeks.
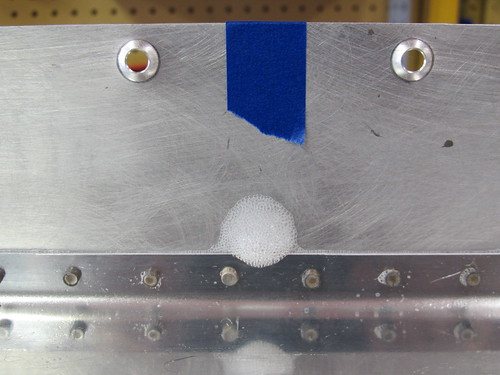
I was somewhat dismayed to find that, when I pressure-tested the left tank this weekend, the first and second leaks were sealed properly but now there is in fact a third leak between the aft baffle and the skin. It's the smallest and slowest of the three thus far, but it means another cycle of proseal and curing.
However, there is good news as well. I put the right tank on the pressure tester for its first go and it passed with flying colors! I pumped it up to one PSI and let it sit for three days. There was no drop in pressure at all. No bubbles anywhere when soaked down with soapy water, etc. Perfect! The moral of this story is to use 40g of sealant when doing the aft baffle, which I did on the right tank, instead of 30g which is what I used on the left tank. ++sealant is good.
Having declared the right fuel tank fully-sealed, I took a bit of time to countersink the 20 guide holes between the aft baffle and the skin and install the final skin rivets. Next, I started preparations for the next phase which is to prime the aft and sides. First, I cut off the fingers of a nitrile glove and use them to cover the fittings on the vent and fuel outlet. I held the glove fingertips in place with rubberbands.
I also added the fuel drain valve (just finger-tight for now). Next I'll cover up the sensor wires, mask-off the outer skin, and the assembly will be ready for priming. I may wait until the left tank is finally done so that I can do both priming steps at once.
Yesterday and today I finally put the aft baffle in place on the right fuel tank.
I did one last inspection of the interior surfaces, then gave everything a good wipe-down with acetone to get all the fingerprints, dust, cat hair, etc. out of the tank. Then I masked off the bits of skin that extend aft of the baffle, mixed up 40 grams of sealant, and went to work covering all of the rib aft flanges and the skin/baffle contact area.
With the sealant in place, I lowered the baffle into position and went to work adding the huge number of clecos it takes to fill every hole. The first part to be riveted was the middle five Z-brackets, which get pop-riveted in place with sealed-end blind rivets. Then, I started the seemingly endless task of riveting the skin to the baffle. Here's a shot after just 15 skin/baffle rivets:
I managed to get one side of the skin/baffle rivets done before I ran out of sealant and had to take a break. I returned this afternoon to finish off the two remaining Z-brackets and the other side of the skin/baffle rivets. This took less than 10g of additional sealant.
Now the right tank is essentially complete, structurally speaking. Once the sealant cures, I still have to pressure test it and countersink/rivet the 20 pilot holes. Then the right and left tank will be in the same state. When they're both pressure tested to my satisfaction, I'll prime the outer surfaces that aren't skin, rivet on the attach bracket spacers, and the fuel tanks will be done done.
24 Apr 2013
This month has been mostly consumed with waiting for sealant to cure on the fuel tanks. Between the aft baffle of the right tank and the second leak in the left tank, both tanks were out of commission curing for the last three weeks.
I was somewhat dismayed to find that, when I pressure-tested the left tank this weekend, the first and second leaks were sealed properly but now there is in fact a third leak between the aft baffle and the skin. It's the smallest and slowest of the three thus far, but it means another cycle of proseal and curing.
However, there is good news as well. I put the right tank on the pressure tester for its first go and it passed with flying colors! I pumped it up to one PSI and let it sit for three days. There was no drop in pressure at all. No bubbles anywhere when soaked down with soapy water, etc. Perfect! The moral of this story is to use 40g of sealant when doing the aft baffle, which I did on the right tank, instead of 30g which is what I used on the left tank. ++sealant is good.
Having declared the right fuel tank fully-sealed, I took a bit of time to countersink the 20 guide holes between the aft baffle and the skin and install the final skin rivets. Next, I started preparations for the next phase which is to prime the aft and sides. First, I cut off the fingers of a nitrile glove and use them to cover the fittings on the vent and fuel outlet. I held the glove fingertips in place with rubberbands.
I also added the fuel drain valve (just finger-tight for now). Next I'll cover up the sensor wires, mask-off the outer skin, and the assembly will be ready for priming. I may wait until the left tank is finally done so that I can do both priming steps at once.
| <-- March 2013 | May 2013 --> |