
| Workshop | Empennage | Wings | Fuselage | Contact |
| <-- February 2013 | April 2013 --> |
Chronological Updates, March, 2013
3 Mar 2013
I put a bit more work into the left aileron, getting the bottom skin and main ribs installed.
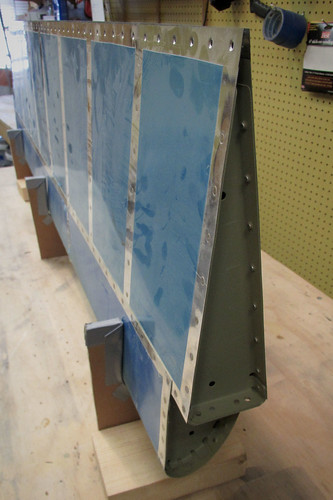
There is only one piece of main aileron structure remaining for this piece—the trailing edge extrusion. This requires sealant to attach, and I'm getting towards the end of my big can of it. I want to make sure I have enough to finish off the fuel tanks, so I may table finishing this aileron until after the ProSeal work on the fuel tanks is done.
I put the left fuel tank back on the workbench and gave it another pressure test, now that some time has passed since I put sealant over the leaky spot. Much to my satisfaction the leak was gone. So I took my pneumatic squeezer and put in the remaining 20 skin-to-aft-bulkhead rivets (the ones that fill the holes used for alignment during the initial aft bulkhead attachment). Since there wasn't any leaks prior to adding these rivets, I didn't use sealant on them. But just to be sure, I went back and pressure tested the tank one more time. Unfortunately, somewhere during this process I seem to have opened up a second leak right at the upper-outboard corner. It doesn't seem to be associated with the rivet that I just added there, but there is a very slight leak coming out of the aft and side on that corner.
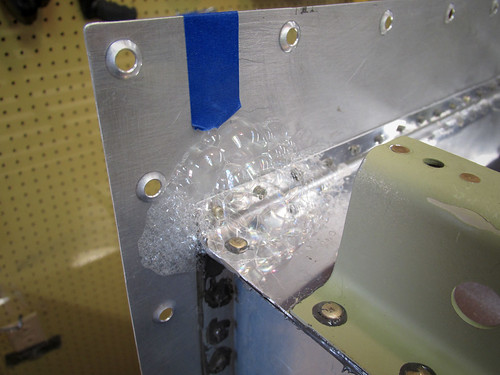
It is a very slow leak, at least twice as slow as the previous leak, and it is at the very highest point in the tank (where fuel will never be except during sloshes), but I am going to seal it up anyway. I already dried all the soapy water off the area and added some Loctite under slight negative pressure. I'll let that dry for now and turn my attention to the other tank. When I get to the next sealant mix on the right tank, I'll add a little dab here to finalize it (hopefully).
10 Mar 2013
A weekend that was meant to be spent on a snowboarding holiday was instead spent terribly ill and doing leak checks on a fuel tank.
This is essentially a reapeat of the "Kool-Aid" test that I did on the left tank, but this time on the nearly-complete right tank. The first step was to get toilet paper taped over all of the rivet lines. Looks something like this:

Then I went to the store to stock up on cold medicine and red food coloring. Here's what 27.5 gallons of very red water looks like in the tank:
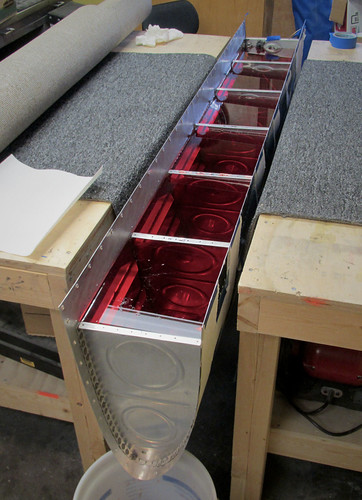
Again, I'm using carpet draped between two work benches as support for the tank. Works like a charm. I tilted the tank slightly in the outboard-down direction, so I wasn't able to get a full 30 gallons in. That water line is right up to within a milimeter or so of the top of the outboard rib, but there is still 1.5" or so of inboard rib above water (hooray for mixed units!).
I let the water sit at maximum for awhile and did spot a couple of immediate leaks. The bigger of the two was at the junction between the skin, forward wing attach bracket, and inboard aft rib:
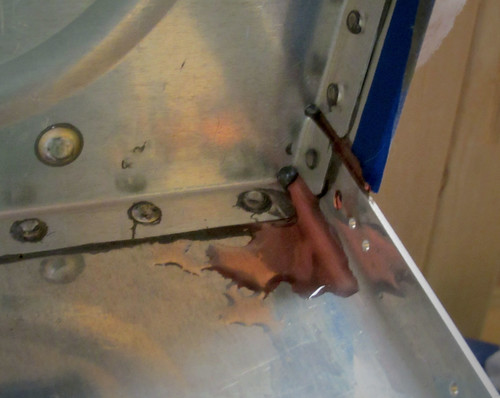
It's actually coming out from three places: the forward and aft sides of the small tab on the rib (but not the inboard side), and from the larger unpopulated hole visible here which goes through the skin and bracket. It isn't clear to me if the water coming out of the hole is actually wicking down there from the aft leak around the small tab, or if there is actually a hole going all the way between the skin and bracket to the inside of the tank. It doesn't really matter; I'll fix this leak internally with a liberal coating of sealant in this corner. Shouldn't be an issue.
If the leak persists after I close up the tank, I can remedy any leaking around the little tab quite easily. If it's still coming out the screw hole, that's going to be a bit more dicey. I'll have to hope that the Loctite trick will work.
The smaller of the two leaks I found was a very slow seep around the bulkhead penetration for the fuel level probe:

Again, this should be straightforward to fix internally, and can be fixed externally if need be after the tank is fully sealed. Not a problem.
I made a bit of a mess because the tank was so full and ended up getting some water drips over the outside, which got onto my TP litmus system, but I'm pretty sure I'm good on all the skin rivets. There was one spot where I couldn't tell if it was a seeping rivet or a spilled drip:
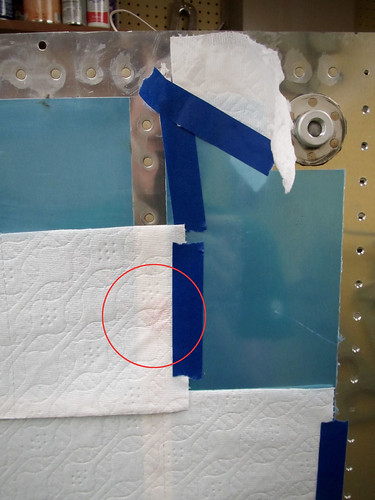
So I'm going to treat the closest rivet to that red spot as suspect and give it Loctite and then additional sealant.
Overall, a lot more problem areas than on the last tank (where there were none), but this isn't entirely surprising since I never did an external sealant pass on the inboard and outboard ribs. I have to let all of the water that has wicked into the nooks and crannies dry out before I hit the right tank with sealant again, so it'll probably be another week before anything happens here. But I should be able to get the aft baffle on before too long here.
17 Mar 2013
Spent some time on the fuel tanks this weekend. First, I sealed up the new leak that appeared in the last pressure test on the left tank. For good measure, I also put a second coat on the seal of the first leak. I'll let that tank sit for a week or two and then give it another pressure test.
On the right tank, I did a final 10 gram batch of sealant to cover up all of the areas that failed the Kool-Aid test last weekend. This included the junction of the bottom skin, forward attach bracket, and aft inboard rib (both inside the tank and outside), as well as additional sealant around both the inside and outside junctions between the fuel sensors and the rib.
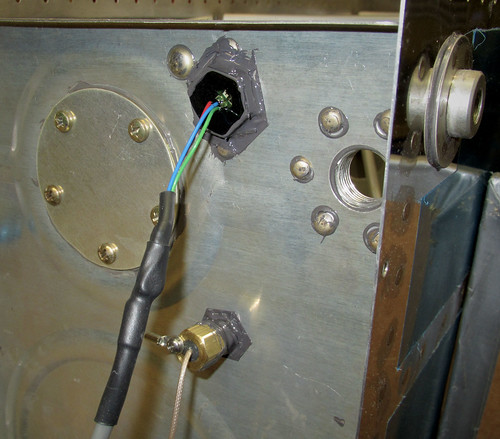
I'm confident that I have plugged the holes that led to the failed pressure test, so I'm declaring this tank ready for its aft baffle. Even if I'm wrong on that assumption, I can add additional sealant from outside the closed tank to these areas without a problem.
The aft baffle will require the bulk of my remaining sealant (I'm still on my first can!) and about 4 hours to complete, if the last tank is a good estimator. I may have time for that sometime this week, otherwise it'll happen next weekend. Then I'll have two sealed tanks!
I put a bit more work into the left aileron, getting the bottom skin and main ribs installed.

There is only one piece of main aileron structure remaining for this piece—the trailing edge extrusion. This requires sealant to attach, and I'm getting towards the end of my big can of it. I want to make sure I have enough to finish off the fuel tanks, so I may table finishing this aileron until after the ProSeal work on the fuel tanks is done.
I put the left fuel tank back on the workbench and gave it another pressure test, now that some time has passed since I put sealant over the leaky spot. Much to my satisfaction the leak was gone. So I took my pneumatic squeezer and put in the remaining 20 skin-to-aft-bulkhead rivets (the ones that fill the holes used for alignment during the initial aft bulkhead attachment). Since there wasn't any leaks prior to adding these rivets, I didn't use sealant on them. But just to be sure, I went back and pressure tested the tank one more time. Unfortunately, somewhere during this process I seem to have opened up a second leak right at the upper-outboard corner. It doesn't seem to be associated with the rivet that I just added there, but there is a very slight leak coming out of the aft and side on that corner.

It is a very slow leak, at least twice as slow as the previous leak, and it is at the very highest point in the tank (where fuel will never be except during sloshes), but I am going to seal it up anyway. I already dried all the soapy water off the area and added some Loctite under slight negative pressure. I'll let that dry for now and turn my attention to the other tank. When I get to the next sealant mix on the right tank, I'll add a little dab here to finalize it (hopefully).
10 Mar 2013
A weekend that was meant to be spent on a snowboarding holiday was instead spent terribly ill and doing leak checks on a fuel tank.
This is essentially a reapeat of the "Kool-Aid" test that I did on the left tank, but this time on the nearly-complete right tank. The first step was to get toilet paper taped over all of the rivet lines. Looks something like this:

Then I went to the store to stock up on cold medicine and red food coloring. Here's what 27.5 gallons of very red water looks like in the tank:

Again, I'm using carpet draped between two work benches as support for the tank. Works like a charm. I tilted the tank slightly in the outboard-down direction, so I wasn't able to get a full 30 gallons in. That water line is right up to within a milimeter or so of the top of the outboard rib, but there is still 1.5" or so of inboard rib above water (hooray for mixed units!).
I let the water sit at maximum for awhile and did spot a couple of immediate leaks. The bigger of the two was at the junction between the skin, forward wing attach bracket, and inboard aft rib:

It's actually coming out from three places: the forward and aft sides of the small tab on the rib (but not the inboard side), and from the larger unpopulated hole visible here which goes through the skin and bracket. It isn't clear to me if the water coming out of the hole is actually wicking down there from the aft leak around the small tab, or if there is actually a hole going all the way between the skin and bracket to the inside of the tank. It doesn't really matter; I'll fix this leak internally with a liberal coating of sealant in this corner. Shouldn't be an issue.
If the leak persists after I close up the tank, I can remedy any leaking around the little tab quite easily. If it's still coming out the screw hole, that's going to be a bit more dicey. I'll have to hope that the Loctite trick will work.
The smaller of the two leaks I found was a very slow seep around the bulkhead penetration for the fuel level probe:

Again, this should be straightforward to fix internally, and can be fixed externally if need be after the tank is fully sealed. Not a problem.
I made a bit of a mess because the tank was so full and ended up getting some water drips over the outside, which got onto my TP litmus system, but I'm pretty sure I'm good on all the skin rivets. There was one spot where I couldn't tell if it was a seeping rivet or a spilled drip:

So I'm going to treat the closest rivet to that red spot as suspect and give it Loctite and then additional sealant.
Overall, a lot more problem areas than on the last tank (where there were none), but this isn't entirely surprising since I never did an external sealant pass on the inboard and outboard ribs. I have to let all of the water that has wicked into the nooks and crannies dry out before I hit the right tank with sealant again, so it'll probably be another week before anything happens here. But I should be able to get the aft baffle on before too long here.
17 Mar 2013
Spent some time on the fuel tanks this weekend. First, I sealed up the new leak that appeared in the last pressure test on the left tank. For good measure, I also put a second coat on the seal of the first leak. I'll let that tank sit for a week or two and then give it another pressure test.
On the right tank, I did a final 10 gram batch of sealant to cover up all of the areas that failed the Kool-Aid test last weekend. This included the junction of the bottom skin, forward attach bracket, and aft inboard rib (both inside the tank and outside), as well as additional sealant around both the inside and outside junctions between the fuel sensors and the rib.

I'm confident that I have plugged the holes that led to the failed pressure test, so I'm declaring this tank ready for its aft baffle. Even if I'm wrong on that assumption, I can add additional sealant from outside the closed tank to these areas without a problem.
The aft baffle will require the bulk of my remaining sealant (I'm still on my first can!) and about 4 hours to complete, if the last tank is a good estimator. I may have time for that sometime this week, otherwise it'll happen next weekend. Then I'll have two sealed tanks!
| <-- February 2013 | April 2013 --> |