
| Workshop | Empennage | Wings | Fuselage | Contact |
| <-- March 2012 | May 2012 --> |
Chronological Updates, April, 2012
1 Apr 2012
This is not an April Fools joke! I am done with all alodining for the wing kit!

Spent most of Saturday doing the alumiprep on numerous wing main body and right flap pieces. Today, I followed that up with alodine on all of the remaining parts that needed it.
The last chemistry step prior to final assembly, priming, will have to wait a bit because I still have a few more pieces to finish up before I can do all the priming at once. But we're on the home stretch now. Off the top of my head, here's what's remaining before I can prime:
15 Apr 2012
I'm making good progress knocking off tasks that need to be completed prior to the final wing primer pass. At this point, there's nothing but skin dimpling left to do.
I touched up the lap joint tapers on the wing skins because I wasn't totally happy with all of them and one of the inboard skins I had put the leading edge tapered corner on the trailing edge by mistake. That's all fixed now.
I went through and deburred and dimpled the flange holes in the right wing main ribs which hadn't been done yet, though this task wasn't getting in the way of the final priming pass since the ribs were already primed.
I re-visited the aileron actuation chapter to finish off a few things that I had screwed up last time. Specifically, I drilled all four ends of the bellcrank-to-aileron pushrods successfully this time. The key to not screwing this up was to use good V-blocks and make sure that everything is aligned well and clamped down properly prior to drilling. And don't use a drill that has some internal misalignment causing the bit to precess. Ask me how I know.
So the pushrods are now good to go and the entire aileron actuation chapter is complete pending primer.
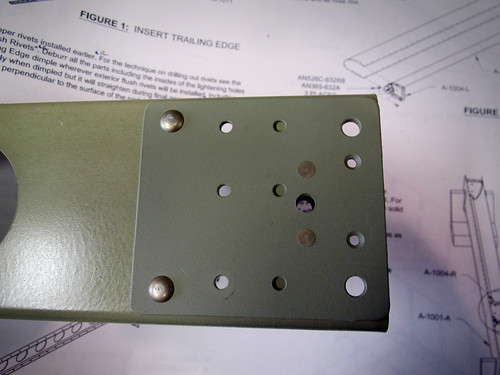
I paged through the entire wing plans looking for stuff I could do that wasn't bottlenecked behind primer and landed on the Aileron Trim chapter. I had already done the bulk of the assembly for the aileron trim module, but it needed to be match-drilled to a wing inspection cover plate and have its four nutplates attached.
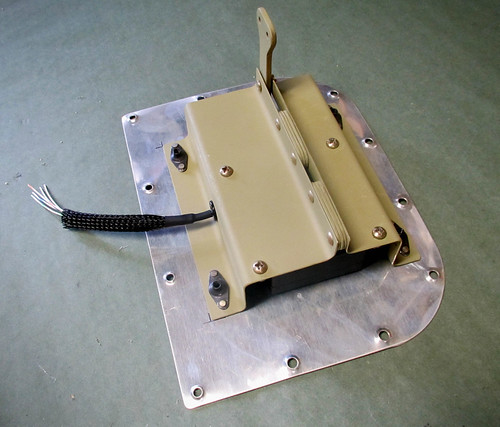
As you can see, that's done. Also, I added a bit of strain relief and some abrasion protection to the thin wires coming out of the servo. I can't finish the other end yet because I don't know what kind of connector I'm going to put on there.
At this point, I'm pretty sure that the only thing left to do is dimple all the wing skins. I got about 1/2 way through one of the big wing skins with Jeremy awhile back before we determined that we really need three people to man-handle those huge aluminum sheets effectively. So today we started in on the smaller pieces now that I'm happy with the lap joint tapers. We got the two inboard top skins done. This means that the remaining tasks prior to priming are:
21 Apr 2012
I've been bottlenecked behind getting the large wing skins dimpled but today Roger came by and for three hours we dimpled all remaining skins. That is the last of the dimpling for the wing kit (aside from a few #8 holes associated with the wing inspection panels and the pitot tube mount). This means that I am ready to do the final priming pass for the wing kit!
22 Apr 2012
Happy Earth Day! I seem to have missed the point of Earth Day, as I spent my entire morning flying down to Grants with Jeff for some pancakes, then the entire afternoon spraying toxic primer into the air and letting lots of MEK and assorted other solvents evaporate. The up side is that I have completed the final primer pass on the wings! I am now ready to begin final assembly on all remaining wing subassemblies (except the wingtips, which can't really be done at all until the rest of the wing is complete). Definitely excited about riveting again!
23 Apr 2012
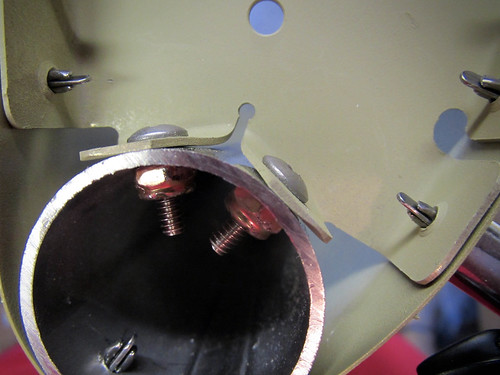
I was anxious to get some riveting done, but was home alone on my lunch break and didn't want to try to rivet the ribs onto the main wing spars alone, so I settled for doing the aileron leading edge assemblies, which can be done solo. Each one took about an hour to get to the point where you slide in the top aft skin and then need a bucker, so I stopped there and set them aside. Here's a few pictures I took of these assemblies. First, the screws and nylocs that hold the counterweight to the nose ribs:
Next, one of the doublers on the aileron spars:
And, finally, the two aileron leading edge assemblies completed up to the part where you put the top skin on, which requires bucking assistance:
I was only doing these because I didn't have a bucker for the main wing ribs, so now that they're bottlenecked behind bucking as well, I'll set these aside for later.
24 Apr 2012
Today I did some quick work finishing up all of the aileron actuation bits and pieces that I could. I started by putting the ends, rod end bearings, and jam nuts on the main pushrods:

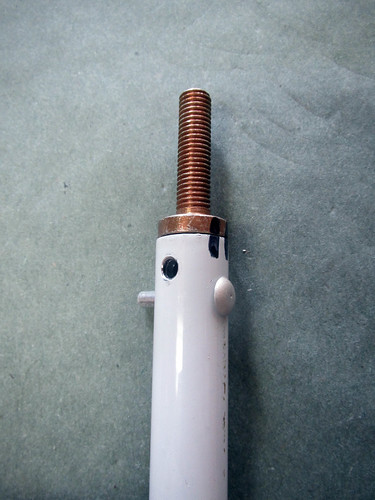
Next, I installed the newly-primed torque tubes into the forward end weldments and tighted down the nuts to 25 in-lbs:
And lastly, I added the ends, rod end bearings, and jam nuts to the bellcrank-to-aileron pushrods:
These were a bit tricky because my squeezer couldn't handle the -11 rivets (they were too long to get adequate force to squeeze them). So I built a little backriveting jig for these. I removed the bottom block from my DRDT-2 dimpler, put my AN470-AD4 cup set into the block, laid the pushrod onto the block such that one of the rivet machine heads was sitting in the cup set, then used a backrivet set to smash the rivet down. It worked pretty well though I would recommend finding some way to clamp the DRDT-2 block down to the workbench (a couple wood screws through the bolt holes would work).
25 Apr 2012
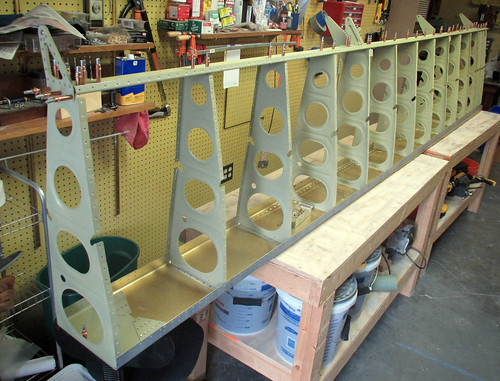
Today I started riveting ribs onto the right wing spar! Big day. Robb came over and helped me buck rivets. He was new to rivet bucking so it took awhile to get up to speed but eventually we ripped through the first 8 or so ribs. Unfortunately, in my haste, I managed to not notice that ribs 1, 7, and 11 were sitting in a different place and I put rib 8 right into rib 7's spot. Ugh. Took awhile to remove that carefully so that I wouldn't damage the spar. Nice work, idiot. After that little episode, I was frustrated with myself and stopped for the night. Here's where it stands for now:
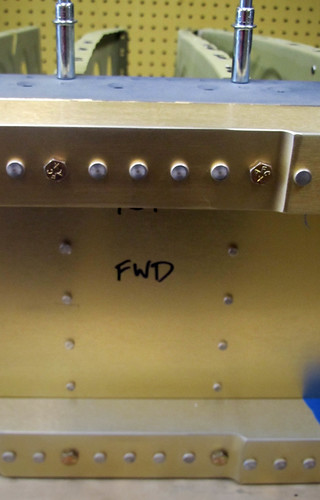
And just for fun, here's a shot of a few of the bolts that I added on the ribs that were fully rivetd in (and in the right place).
I'm not sure why I decided to put the machine heads of the rivets on the aft face of the spar; I have a feeling that I should have gone the other way. I guess I just wanted my rivets to match the big rivets that came pre-done on the wing spar. Certainly on the inboard-most rib, there is no room for a rivet gun between the spar and the torque tube bearing bracket, so those ones will have to be machine head forward.
29 Apr 2012
This weekend I finished up work on the right wing skeleton. I put the rest of the ribs on the spar with Jeremey's help, though I somehow managed to get #14 on upside down (?? what is wrong with me?). After fixing that one, I put in all of the bolts as required and did the 14 forward rib flange rivets for the ribs behind the fuel tanks. Turning the wing body forward-side down, I cleco'd on the aft spar and its assorted doublers and accessories. The result looked like this:
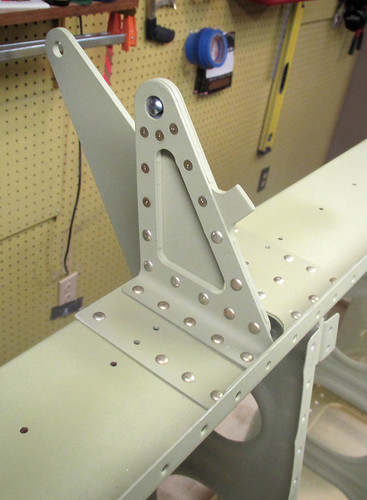
Most of the rivets in the aft spar can be squeezed, though there are a couple that I had to do with the bucking bar. Also, all of the -8 rivets at the inboard end are too long for my squeezer to effectively compress, so those ones were done manually as well. Luckily, because the visibility is so good, I was able to buck these myself. Here's a closeup of the inboard aileron hinge bracket after riveting:
With all of the rivets done on the aft spar, that made the skeleton for the right main wing body complete so I laid the J-stiffeners in place and cleco'd on the top skins. Here's the skeleton with the first piece of skin in place:
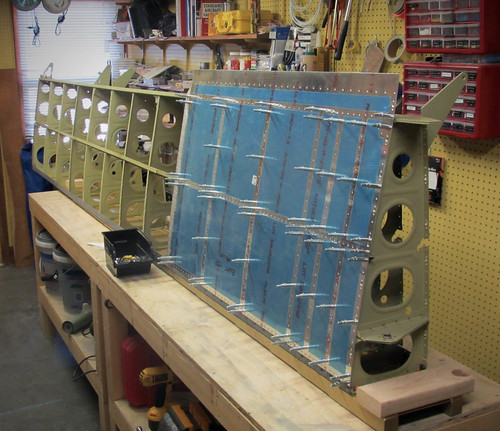
So now it's time for lots and lots of skin riveting. I've got my long backrivet sets (straight and double-offset) so I can try to back-rivet as many of these as possible for optimal surface finish. Unfortunately, I'll need help for all of these so the going may be slow.
This is not an April Fools joke! I am done with all alodining for the wing kit!
Spent most of Saturday doing the alumiprep on numerous wing main body and right flap pieces. Today, I followed that up with alodine on all of the remaining parts that needed it.
The last chemistry step prior to final assembly, priming, will have to wait a bit because I still have a few more pieces to finish up before I can do all the priming at once. But we're on the home stretch now. Off the top of my head, here's what's remaining before I can prime:
- Finish dimpling wing skins
- Fabricate a couple of aileron actuation parts that need priming
- fix up the edge taper on a couple pieces of wing skin
15 Apr 2012
I'm making good progress knocking off tasks that need to be completed prior to the final wing primer pass. At this point, there's nothing but skin dimpling left to do.
I touched up the lap joint tapers on the wing skins because I wasn't totally happy with all of them and one of the inboard skins I had put the leading edge tapered corner on the trailing edge by mistake. That's all fixed now.
I went through and deburred and dimpled the flange holes in the right wing main ribs which hadn't been done yet, though this task wasn't getting in the way of the final priming pass since the ribs were already primed.
I re-visited the aileron actuation chapter to finish off a few things that I had screwed up last time. Specifically, I drilled all four ends of the bellcrank-to-aileron pushrods successfully this time. The key to not screwing this up was to use good V-blocks and make sure that everything is aligned well and clamped down properly prior to drilling. And don't use a drill that has some internal misalignment causing the bit to precess. Ask me how I know.
So the pushrods are now good to go and the entire aileron actuation chapter is complete pending primer.
I paged through the entire wing plans looking for stuff I could do that wasn't bottlenecked behind primer and landed on the Aileron Trim chapter. I had already done the bulk of the assembly for the aileron trim module, but it needed to be match-drilled to a wing inspection cover plate and have its four nutplates attached.
As you can see, that's done. Also, I added a bit of strain relief and some abrasion protection to the thin wires coming out of the servo. I can't finish the other end yet because I don't know what kind of connector I'm going to put on there.
At this point, I'm pretty sure that the only thing left to do is dimple all the wing skins. I got about 1/2 way through one of the big wing skins with Jeremy awhile back before we determined that we really need three people to man-handle those huge aluminum sheets effectively. So today we started in on the smaller pieces now that I'm happy with the lap joint tapers. We got the two inboard top skins done. This means that the remaining tasks prior to priming are:
- Dimple 3.5 outboard wing skins
- Dimple 2 inboard wing skins
21 Apr 2012
I've been bottlenecked behind getting the large wing skins dimpled but today Roger came by and for three hours we dimpled all remaining skins. That is the last of the dimpling for the wing kit (aside from a few #8 holes associated with the wing inspection panels and the pitot tube mount). This means that I am ready to do the final priming pass for the wing kit!
22 Apr 2012
Happy Earth Day! I seem to have missed the point of Earth Day, as I spent my entire morning flying down to Grants with Jeff for some pancakes, then the entire afternoon spraying toxic primer into the air and letting lots of MEK and assorted other solvents evaporate. The up side is that I have completed the final primer pass on the wings! I am now ready to begin final assembly on all remaining wing subassemblies (except the wingtips, which can't really be done at all until the rest of the wing is complete). Definitely excited about riveting again!
23 Apr 2012
I was anxious to get some riveting done, but was home alone on my lunch break and didn't want to try to rivet the ribs onto the main wing spars alone, so I settled for doing the aileron leading edge assemblies, which can be done solo. Each one took about an hour to get to the point where you slide in the top aft skin and then need a bucker, so I stopped there and set them aside. Here's a few pictures I took of these assemblies. First, the screws and nylocs that hold the counterweight to the nose ribs:
Next, one of the doublers on the aileron spars:
And, finally, the two aileron leading edge assemblies completed up to the part where you put the top skin on, which requires bucking assistance:
I was only doing these because I didn't have a bucker for the main wing ribs, so now that they're bottlenecked behind bucking as well, I'll set these aside for later.
24 Apr 2012
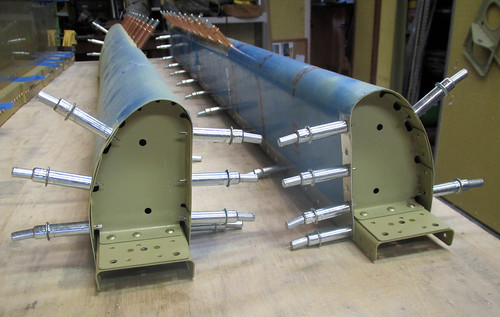
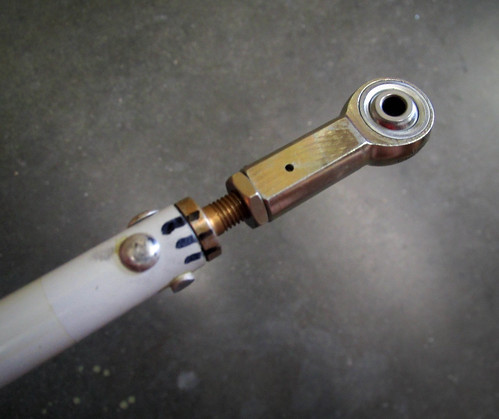
Today I did some quick work finishing up all of the aileron actuation bits and pieces that I could. I started by putting the ends, rod end bearings, and jam nuts on the main pushrods:
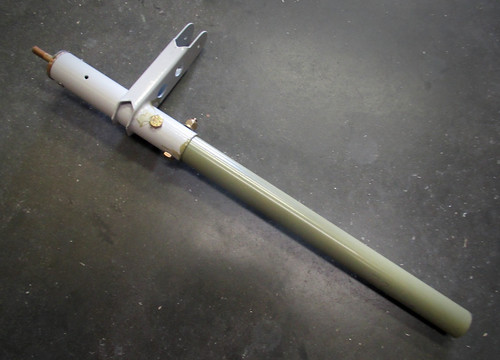
Next, I installed the newly-primed torque tubes into the forward end weldments and tighted down the nuts to 25 in-lbs:
And lastly, I added the ends, rod end bearings, and jam nuts to the bellcrank-to-aileron pushrods:
These were a bit tricky because my squeezer couldn't handle the -11 rivets (they were too long to get adequate force to squeeze them). So I built a little backriveting jig for these. I removed the bottom block from my DRDT-2 dimpler, put my AN470-AD4 cup set into the block, laid the pushrod onto the block such that one of the rivet machine heads was sitting in the cup set, then used a backrivet set to smash the rivet down. It worked pretty well though I would recommend finding some way to clamp the DRDT-2 block down to the workbench (a couple wood screws through the bolt holes would work).
25 Apr 2012
Today I started riveting ribs onto the right wing spar! Big day. Robb came over and helped me buck rivets. He was new to rivet bucking so it took awhile to get up to speed but eventually we ripped through the first 8 or so ribs. Unfortunately, in my haste, I managed to not notice that ribs 1, 7, and 11 were sitting in a different place and I put rib 8 right into rib 7's spot. Ugh. Took awhile to remove that carefully so that I wouldn't damage the spar. Nice work, idiot. After that little episode, I was frustrated with myself and stopped for the night. Here's where it stands for now:
And just for fun, here's a shot of a few of the bolts that I added on the ribs that were fully rivetd in (and in the right place).
I'm not sure why I decided to put the machine heads of the rivets on the aft face of the spar; I have a feeling that I should have gone the other way. I guess I just wanted my rivets to match the big rivets that came pre-done on the wing spar. Certainly on the inboard-most rib, there is no room for a rivet gun between the spar and the torque tube bearing bracket, so those ones will have to be machine head forward.
29 Apr 2012
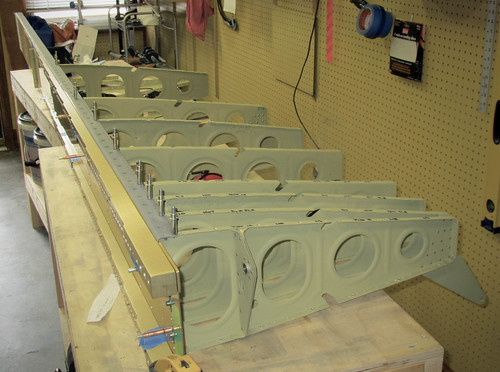
This weekend I finished up work on the right wing skeleton. I put the rest of the ribs on the spar with Jeremey's help, though I somehow managed to get #14 on upside down (?? what is wrong with me?). After fixing that one, I put in all of the bolts as required and did the 14 forward rib flange rivets for the ribs behind the fuel tanks. Turning the wing body forward-side down, I cleco'd on the aft spar and its assorted doublers and accessories. The result looked like this:
Most of the rivets in the aft spar can be squeezed, though there are a couple that I had to do with the bucking bar. Also, all of the -8 rivets at the inboard end are too long for my squeezer to effectively compress, so those ones were done manually as well. Luckily, because the visibility is so good, I was able to buck these myself. Here's a closeup of the inboard aileron hinge bracket after riveting:
With all of the rivets done on the aft spar, that made the skeleton for the right main wing body complete so I laid the J-stiffeners in place and cleco'd on the top skins. Here's the skeleton with the first piece of skin in place:
So now it's time for lots and lots of skin riveting. I've got my long backrivet sets (straight and double-offset) so I can try to back-rivet as many of these as possible for optimal surface finish. Unfortunately, I'll need help for all of these so the going may be slow.
| <-- March 2012 | May 2012 --> |