
| Workshop | Empennage | Wings | Fuselage | Contact |
| <-- February 2012 | April 2012 --> |
Chronological Updates, February, 2012
3 Mar 2012
Fuel tank finaly assembly has begun!
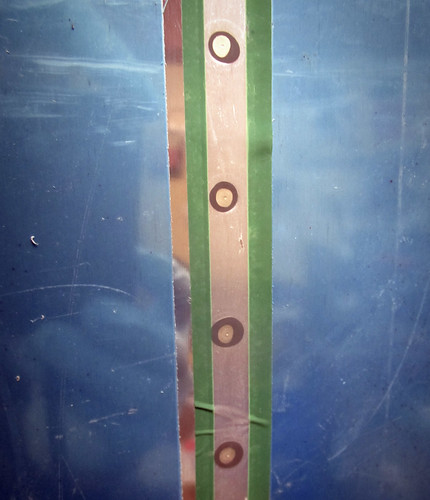
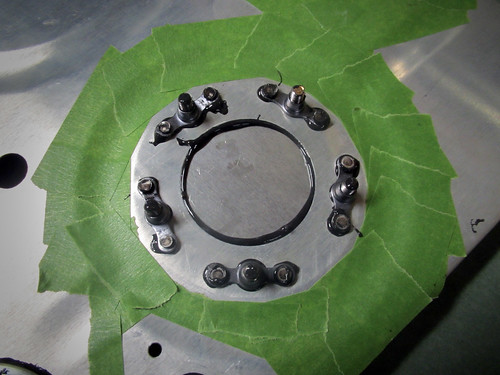
I grabbed the left fuel tank skin and deburred it inside and out. The edges were already deburred for some reason, so I moved right ahead with removing the vinyl lines. The last thing to do was to scuff all of the places where two pieces contact each other. For the most part this just meant masking off the lines I had drawn last time the tank was assembled and rubbing the rivet lines with Scotchbrite. The fuel fill flange and drain required a bit of fancy masking...
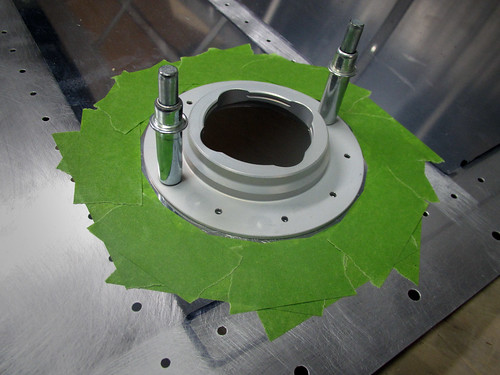
OK, that was probably overkill... but the resulting scuff ring looks very nice and circular. Too bad no one will ever see it once I button the tank up.
The last thing I did before dimpling was to give the inner tank surface a thorough cleaning with acetone. I wanted to make sure I got all of the metal dust from the Scotchbrite off of there, along with any finger oils, etc. that might prevent the Pro Seal from sticking as well as it might. I invited Jamie over this weekend to lend a hand supporting the tank skin while I operated the DRDT-2 dimpler with the special tank dimple dies. We worked through the entire skin in just over half an hour, then it was time for working with Pro Seal. Let the fun begin.
I took a cue from Mike Howe's project and used Easy Mask combination tape/paper to make a protected area around each piece so that over splatter from the inevitable thin strings of Pro Seal that go everywhere wouldn't turn my inner surface into some kind of Jackson Pollock tribute. It worked great.
I used a $25 kitchen scale purchased from Amazon to measure out 20 grams of the white sealant compound, then an additional 2 grams of the black accelerant. I used some super high tech stuff to mix it, namely a plastic knife and a paper soup bowl. It smelled exactly like everyone had described, which is to say quite awful. Not wanting to waste the 45-60 minutes of set time, I set right to work on the tank skin stiffeners. I'm glad I spent as much time laying out everything I might need beforehand, as those 45 minutes went by really quick. I put a healthy coating of Pro Seal on the contact face of the stiffener, cleco'd it into place, then added one rivet at a time after putting a little dab of Pro Seal on the end of each one. Once all the rivets were in place, I put some rivet tape over them so that the excess sealant wouldn't get all over my back riveting plate. The back riveting process got sealant all over my rivet set, which had to be cleaned off with a paper towel after each set of three rivets lest it clog up the spring-loaded sheath on the set. Fun times.
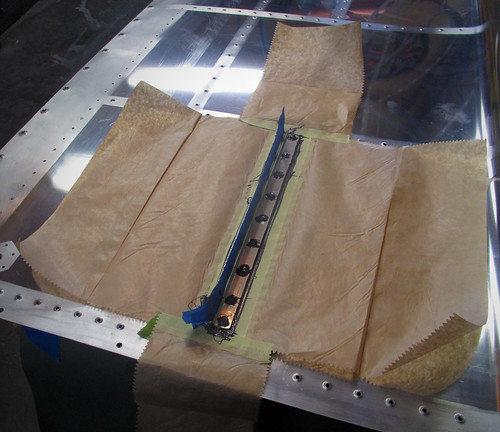
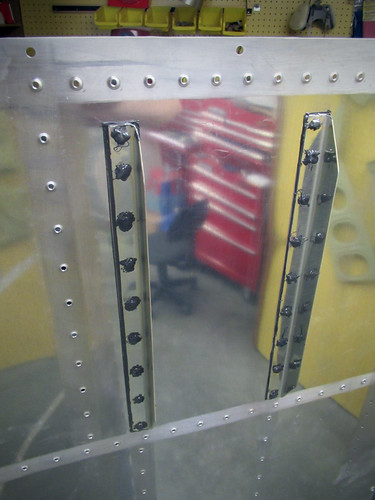
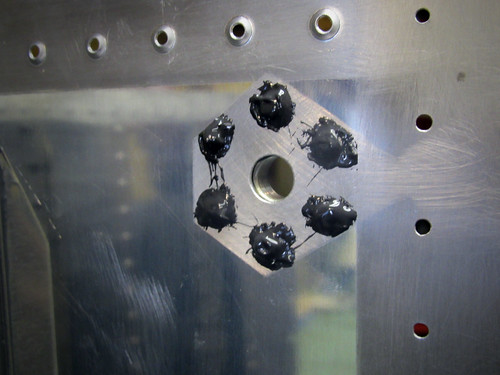
Above you can see the Easy Mask paper as well as a couple pieces of blue painter's tape that I used to keep pro seal off of the vertical part of the stiffener. Once I had done all of the back riveting, I went around the edge of the stiffener/skin joint and made a good fillet of Pro Seal with my plastic knife. Then I took a dollup of Pro Seal to each of the rivet shop heads. In this way, none of the interfaces between parts or parts and rivets were visible. Just lots and lots of sealant. Here's a closeup:
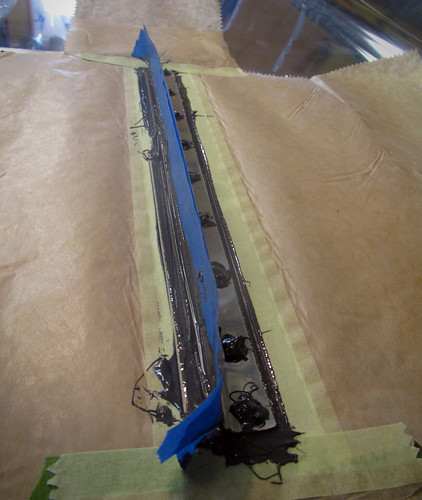
I wasn't sure how long to wait to remove the masking once I was happy with the state of the sealant, so I tried just removing the first one immediately. It worked great; no need to wait. Here's the result:
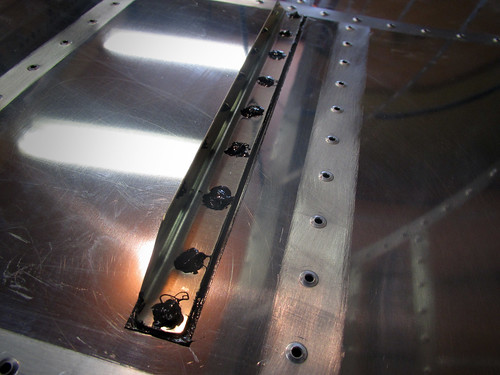
Here's what the shop head on the first set of rivets looked like before I removed the rivet tape:
That's actually a lot more excess than on later rivets. I got a system worked out where I would have just enough sealant on the outer side to be visible around the rivets but not huge rings like this. Each time I finished a stiffener, I'd stand the skin up on its side, take the rivet tape off, and wipe off all of this excess sealant with a paper towel. It wasn't too difficult since the Pro Seal hadn't set yet. The resulting rivet lines look great. Just a hint of a sealant ring around some of them.
And just for kicks, here's one more view of a couple complete stiffeners as seen from the inside:
So here's some notes for anyone else reaching this stage: 20 + 2 grams of Pro Seal was too much; I wasn't able to use it all before it hardened up. I think I probably could have done four stiffeners with that much if I had been careful, but by the time I finished my third stiffener the sealant was getting noticeably difficult to work with. I recommend going with 10 grams of sealant and 1 gram of accelerant at a time and try to get two stiffeners done with that much. Do the dollups on the top of the rivet heads last as they can be done later if you run out of a batch.
Three stiffeners using the techniques described above took me about an hour. The tank assembly is clearly going to be a long process; but I'm excited to be doing final assembly again!
6 Mar 2012
The Pro Seal Fiesta marches onwards.
I'm still working on getting all of the stiffeners riveted to the left fuel tank. I've got 12 of 14 done. I've found that mixing 10g of white sealant with 1g of black accelerant gives me plenty for two stiffeners and then a dollup left over to do some of the other accessories. Rather than bore you with pictures of each identical stiffener as I add them, here are some of the accessories that I've gotten mounted. First up, the fuel drain flange on the bottom-inboard-aft corner of the skin:
I made sure that all of the rivets had a ring of sealant around them when squeezed (I've since wiped it away on this side) and that the flange itself has a good fillet of sealant around its outer edge where it contacts the skin. On the inside, it looks like this:
Here, I put a large dollup of sealant on each rivet's shop head to make sure ther were no leaks around the rivets themselves. I also made sure that there was a good fillet of sealant between the skin and flange inside the hole, but that sealant didn't get onto the threads.
The next thing I did was to attack the tooling holes in the inboard and outboard ribs. The plans call for fabricating a small plate and riveting/sealing it in place, but I figured why not just fill the holes with appropriately-sized rivets? I had some AN470AD6-7 rivets laying around from something else and they fill the holes perfectly. I just coated the shaft of each rivet with sealant and then pounded them into place.
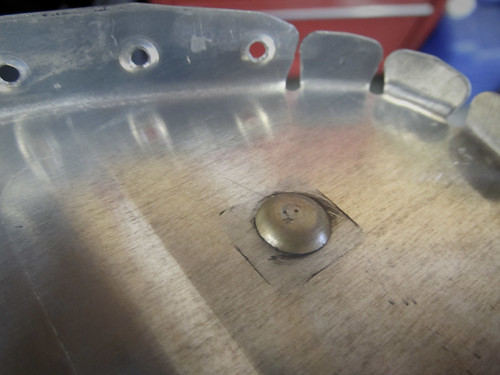
There was a big ring of sealant around the machine head of the rivet after I got it set, which I wiped away before this picture was taken. I just wanted to make sure that there was a thin layer of sealant between the machine head flange and the rib web. On the shop head side, I just covered the whole thing in a bunch of sealant (masked nicely with tape).

The -7 rivet is way too long for just going through this piece of skin, but in this case it is not structural at all and just needs to set enough to hold firmly in place. There are two of these on the outboard fuel tank rib, two on the inboard nose rib, and two on the inboard aft rib.
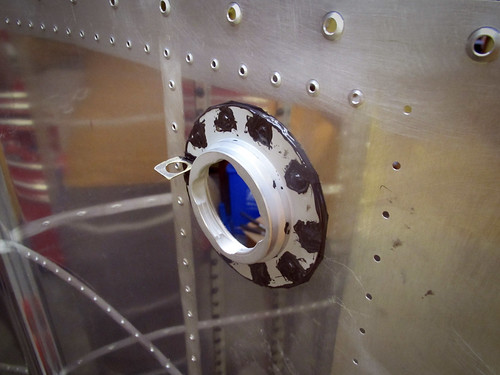
Next up was the fuel pickup flange, which was basically the same idea as the fuel drain flange. After that I did the inspection cover. I'm using capacitance fuel level probes, so I don't need the floats that usually mount through the inspection port. Instead, I just fabricated a port cover plate and semi-permanently installed it.

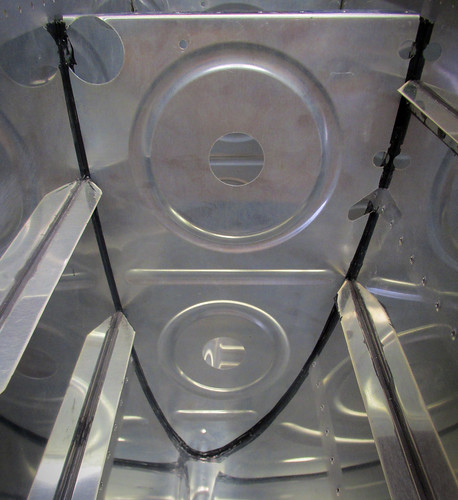
Technically it'll be removable, but it's got a ton of sealant holding it on. Plus, I'm going to cover the screw heads in sealant as well as all of the nutplates and exposed threads on the inside. So getting this cover off will be a real chore. Hopefully, it'll never have to happen. Here's a view of the inside as it stands now, without the sealant applied to the nutplates and screws:
That's as far as I got tonight. Somewhere on the 12th skin stiffener was the 7,000th rivet in the plane! What's left prior to rib installation in the skin is:
10 Mar 2012
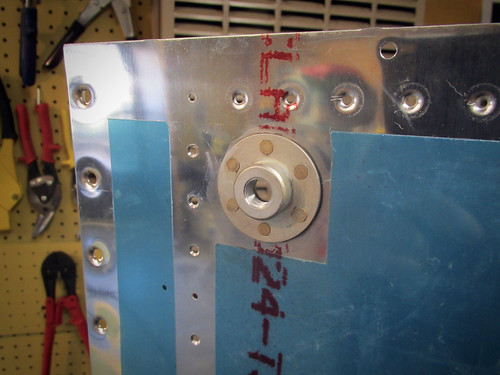
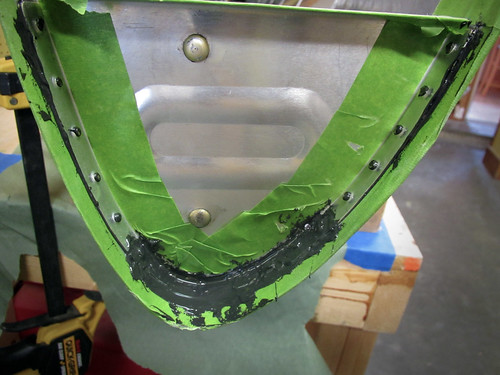
Still slowly progressing through the left fuel tank final assembly. Got all of the stiffeners installed as well as the fuel cap flange and all of the bits that rivet onto the aft inboard rib. Here's the fuel cap flange:

I think the outside looks great; all of the rivets came out well and the thin fillet of sealant between the skin and the flange is perfect. Here's a shot of the inside, showing the installed vent line clip and all of the sealant fillets and rivet head coverings:
There were numerous instances on all parts where I had made a fillet of sealant connecting the part to the skin, only to have a bubble pop in the sealant overnight and leave something that looked like this:

I can't be certain tha some of these voids won't allow leaks (and there were a couple on the aft inboard rib where I could see light coming through them, so obviously leaky there...). I had to go around and mark all of them, then hit them with a dab of sealant in the next batch. At this point I'm pretty sure that all of the bubbles in the stiffeners, aft inboard rib, and fuel cap flange have been taken care of. It's going to be hard to inspect for these once I get the ribs in, so I'm going to start using more sealant around the edges to guard against this.
Speaking of ribs, everything else was done so it was time to move on to the first of the ribs—the forward inboard rib. Here's a shot of it in progress, just after getting all of the rivets squeezed and starting to lay on the sealant:
Because this is an outer surface of the fuel tank, I put an extra huge coating of sealant on the holes at the forward bend in the rib. I also used quite a bit of sealant in the fillet on the inner surface. Here's the inner fillet:

Despite using tons of sealant along this edge, on both sides, I still managed to allow one of the holes to open up and require a touch-up.
Jeremy was avaialble early this afternoon so we set about installing the first full rib. It went pretty well, with no significant problems.
Between the pre-installationg cleaning of parts, the masking of the skin and rib, the mixing and distribution of sealant, the riveting, and all of the cleanup, installing this one part took about 2.5 hours. Only an hour of that was riveting. So the overhead on fuel tank assembly is pretty severe. Here's a picture of the other side of that rib with the very nice-looking fillet around the edge:
I'm going through paper towels and nitrile gloves at an astounding rate, but so far I'm pretty happy with my progress and feel reasonably confident that I won't have any leaks from the parts I've done thus far. Five more full-sized ribs and the aft half of the inboard rib to go...
23 Mar 2012
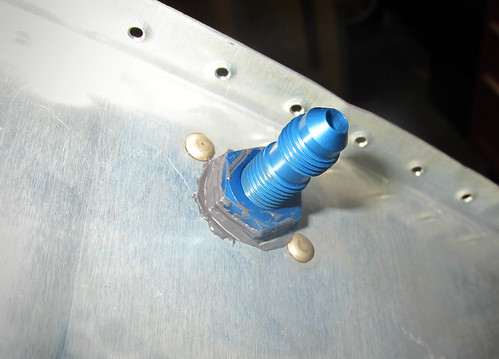
Getting help with bucking for the interior bits of the fuel tanks turns out to be difficult, so progress has been a lot slower than I'd hoped on the left fuel tank. I'm up to three of the five interior ribs done now. I had some spare Pro Seal on the rib that got done tonight so I used it to install the tank vent fitting and nut in the inboard rib. Here's how it looks on the outside:
And here's how it looks on the inside:
The outer end of the fitting will be used to attach a manometer during the tank leak check, but otherwise will not be touched again until the wings are attached to the fuselage, which is a long way off.
The inner side of the fitting gets attached to the vent tube, so I went ahead and cut a piece of soft aluminum tubing to length, straightened it, and used my new flaring tool to give it a nice 37° flare. Here is the result:
Flaring is super easy and I was very happy with the results. This tube assembly now gets set aside until I've finished all of the tank ribs and the J-stiffener.
While waiting for shop assistance to be available for bucking the ribs, I've been finding a few other odds and ends to work on.
For starters, I finally figured out the right hardware to attach the Princeton capacitance fuel probes to the fueltank rib with. Why they don't ship with it is a mystery to me, but whatever. The answer is a brass 1/4" NPT compression fitting nut which McMaster Carr sells for under a dollar. For those familiar with compression fittings, note that you do not need the sleeve; just the nut. I did run into a problem with the fuel probe that I had already test-fit, because where I had bent it, it was now slightly larger in one dimension than 0.25" and the tolerance on the hole in the compression fitting nut is quite close.
The solution was just to drill out the hole in the nut to 0.29", which is what the widest part of the bends ended up being. I'm not counting on the compression fitting for a good seal (everything will be coated with Pro Seal on the inside anyway), so the added gap around the tubing when secured shouldn't be an issue. There's still plenty of shoulder on the nut to make tight against the fuel probe.
The next thing I did while waiting for rivet buckers was to add a bit of heat reflector to the inside of the skin around the landing light in the left leading edge. I started by ordering a 3' length of Van's self-adhesive heat reflector, which turns out just to be really wide aluminum tape. It comes in a 30" width, which is perfect because you want two 15" x 22" pieces for the two landing light bays. Without removing the backing, I laid the reflector piece in the bay and marked it where I needed to make a cutout for the landing light lens and attachment hardware. When this was removed, it looked like this:
Peeling the backing off all at once and trying to maneuver the very sticky aluminum into position seemed like a bad idea, so I just peeled off a bit and got it stuck up under the J-stiffener, then incrementally peeled off a bit more backing and rolling the tap into place. When it was all done, I used a wooden shim as a squeegee to flatten it out (mostly). Here's the result:
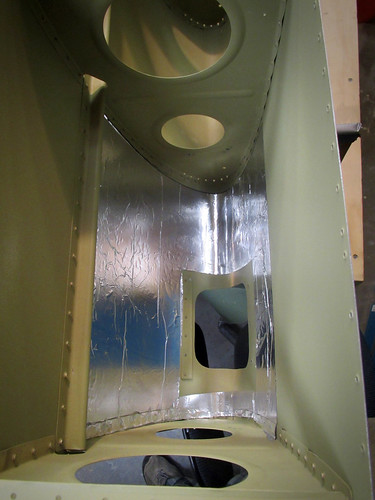
And when the landing light bracket and lens are put back in place, it looks like this:
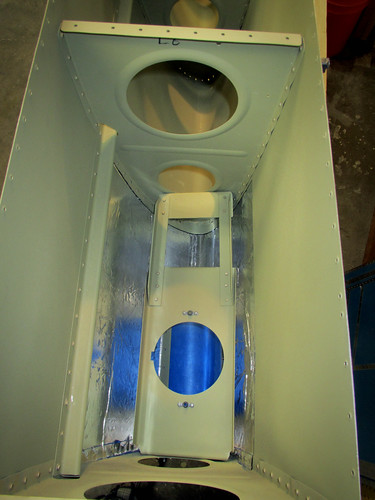
Total time to install, about 20 minutes—most of which was futzing around trying to get the bracket screws back in place through the lens hole, which is a real pain.
Now I know that a heat reflector here probably isn't necessary; I've never heard of anyone having problems with paint discolorization or bubbling around their landing lights, but for $4 in materials and less than an hour to do both, I figured why not. I have only seen one other builder do any heat treatments for the landing light bay, and he did a high-temperature engine paint on the inside of the bay. I wanted mine to be slightly higher utility and figured that the highly-reflective aluminum will end up with slightly more light getting out the lens... so maybe that's a win? Whatever.
30 Mar 2012
I had bronchitis there for a week or so, and as a result not a lot of work got done. But a few things did happen here and there.
For one thing, I did manage to get all of the ribs installed in the left fuel tank:
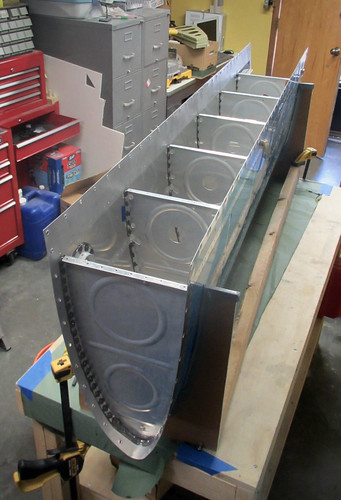
I ended up doing a couple passes of touch-ups with Pro Seal to make sure there weren't any bubbles or pinholes in the fillets around the ribs, so I'm reasonably confident at this point that there won't be any leaks from the rivets I've put in thus far.
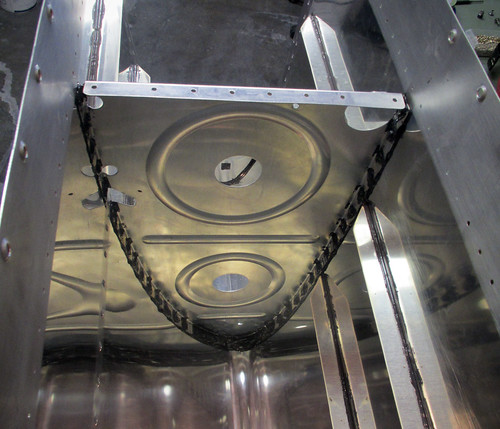
I got Jeremy to help me put the J-stiffener in as well. It was somewhat of a challenge to do the forward fillet behind the curl of the stiffener. I ended up just putting a blob of sealant on my (gloved) finger and sticking it up underneath the stiffener. Then I'd go back with a popsicle stick and try to smooth it out, blind. Finally, I'd have a look with a mirror and a flashlight to see how I did. I probably went a bit heavy with the sealant here which made it a lot easier. Here's a shot of the inboard bay with the J-stiffener installed.
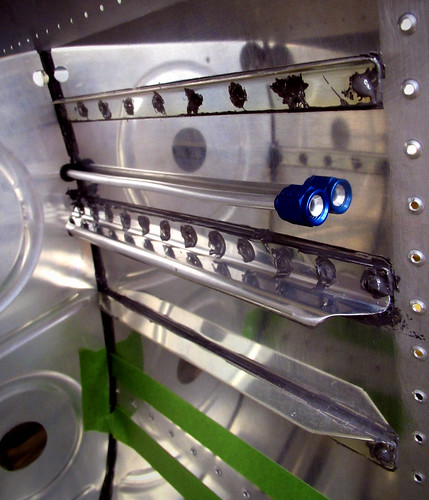
Also visible is the installed vent tube. This was trivial to do, since it just involves 6 snap bushings and the already-fabricated tube. The hand-bend in the outboard bay to line up with the vent clip was trivial, and I expect the bend in the inboard bay to line up with the bulkhead union to be similarly easy. Once I get the inboard aft rib installed, I'll hit each of the snap bushing/tube/rib intersections with a bit of Pro Seal to keep it from vibrating around too much.
The whole reason I put aside the work on the main body of the wing and started assembling this fuel tank was because it was cold out and I wanted to do the chemistry phase of the main body work outside if I could. This weekend's forecast is for great weather and warm temps, so I may shelve the fuel tank for awhile and go back to working on the rest of the wing.
Fuel tank finaly assembly has begun!
I grabbed the left fuel tank skin and deburred it inside and out. The edges were already deburred for some reason, so I moved right ahead with removing the vinyl lines. The last thing to do was to scuff all of the places where two pieces contact each other. For the most part this just meant masking off the lines I had drawn last time the tank was assembled and rubbing the rivet lines with Scotchbrite. The fuel fill flange and drain required a bit of fancy masking...
OK, that was probably overkill... but the resulting scuff ring looks very nice and circular. Too bad no one will ever see it once I button the tank up.
The last thing I did before dimpling was to give the inner tank surface a thorough cleaning with acetone. I wanted to make sure I got all of the metal dust from the Scotchbrite off of there, along with any finger oils, etc. that might prevent the Pro Seal from sticking as well as it might. I invited Jamie over this weekend to lend a hand supporting the tank skin while I operated the DRDT-2 dimpler with the special tank dimple dies. We worked through the entire skin in just over half an hour, then it was time for working with Pro Seal. Let the fun begin.
I took a cue from Mike Howe's project and used Easy Mask combination tape/paper to make a protected area around each piece so that over splatter from the inevitable thin strings of Pro Seal that go everywhere wouldn't turn my inner surface into some kind of Jackson Pollock tribute. It worked great.
I used a $25 kitchen scale purchased from Amazon to measure out 20 grams of the white sealant compound, then an additional 2 grams of the black accelerant. I used some super high tech stuff to mix it, namely a plastic knife and a paper soup bowl. It smelled exactly like everyone had described, which is to say quite awful. Not wanting to waste the 45-60 minutes of set time, I set right to work on the tank skin stiffeners. I'm glad I spent as much time laying out everything I might need beforehand, as those 45 minutes went by really quick. I put a healthy coating of Pro Seal on the contact face of the stiffener, cleco'd it into place, then added one rivet at a time after putting a little dab of Pro Seal on the end of each one. Once all the rivets were in place, I put some rivet tape over them so that the excess sealant wouldn't get all over my back riveting plate. The back riveting process got sealant all over my rivet set, which had to be cleaned off with a paper towel after each set of three rivets lest it clog up the spring-loaded sheath on the set. Fun times.
Above you can see the Easy Mask paper as well as a couple pieces of blue painter's tape that I used to keep pro seal off of the vertical part of the stiffener. Once I had done all of the back riveting, I went around the edge of the stiffener/skin joint and made a good fillet of Pro Seal with my plastic knife. Then I took a dollup of Pro Seal to each of the rivet shop heads. In this way, none of the interfaces between parts or parts and rivets were visible. Just lots and lots of sealant. Here's a closeup:
I wasn't sure how long to wait to remove the masking once I was happy with the state of the sealant, so I tried just removing the first one immediately. It worked great; no need to wait. Here's the result:
Here's what the shop head on the first set of rivets looked like before I removed the rivet tape:
That's actually a lot more excess than on later rivets. I got a system worked out where I would have just enough sealant on the outer side to be visible around the rivets but not huge rings like this. Each time I finished a stiffener, I'd stand the skin up on its side, take the rivet tape off, and wipe off all of this excess sealant with a paper towel. It wasn't too difficult since the Pro Seal hadn't set yet. The resulting rivet lines look great. Just a hint of a sealant ring around some of them.
And just for kicks, here's one more view of a couple complete stiffeners as seen from the inside:
So here's some notes for anyone else reaching this stage: 20 + 2 grams of Pro Seal was too much; I wasn't able to use it all before it hardened up. I think I probably could have done four stiffeners with that much if I had been careful, but by the time I finished my third stiffener the sealant was getting noticeably difficult to work with. I recommend going with 10 grams of sealant and 1 gram of accelerant at a time and try to get two stiffeners done with that much. Do the dollups on the top of the rivet heads last as they can be done later if you run out of a batch.
Three stiffeners using the techniques described above took me about an hour. The tank assembly is clearly going to be a long process; but I'm excited to be doing final assembly again!
6 Mar 2012
The Pro Seal Fiesta marches onwards.
I'm still working on getting all of the stiffeners riveted to the left fuel tank. I've got 12 of 14 done. I've found that mixing 10g of white sealant with 1g of black accelerant gives me plenty for two stiffeners and then a dollup left over to do some of the other accessories. Rather than bore you with pictures of each identical stiffener as I add them, here are some of the accessories that I've gotten mounted. First up, the fuel drain flange on the bottom-inboard-aft corner of the skin:
I made sure that all of the rivets had a ring of sealant around them when squeezed (I've since wiped it away on this side) and that the flange itself has a good fillet of sealant around its outer edge where it contacts the skin. On the inside, it looks like this:
Here, I put a large dollup of sealant on each rivet's shop head to make sure ther were no leaks around the rivets themselves. I also made sure that there was a good fillet of sealant between the skin and flange inside the hole, but that sealant didn't get onto the threads.
The next thing I did was to attack the tooling holes in the inboard and outboard ribs. The plans call for fabricating a small plate and riveting/sealing it in place, but I figured why not just fill the holes with appropriately-sized rivets? I had some AN470AD6-7 rivets laying around from something else and they fill the holes perfectly. I just coated the shaft of each rivet with sealant and then pounded them into place.
There was a big ring of sealant around the machine head of the rivet after I got it set, which I wiped away before this picture was taken. I just wanted to make sure that there was a thin layer of sealant between the machine head flange and the rib web. On the shop head side, I just covered the whole thing in a bunch of sealant (masked nicely with tape).
The -7 rivet is way too long for just going through this piece of skin, but in this case it is not structural at all and just needs to set enough to hold firmly in place. There are two of these on the outboard fuel tank rib, two on the inboard nose rib, and two on the inboard aft rib.
Next up was the fuel pickup flange, which was basically the same idea as the fuel drain flange. After that I did the inspection cover. I'm using capacitance fuel level probes, so I don't need the floats that usually mount through the inspection port. Instead, I just fabricated a port cover plate and semi-permanently installed it.
Technically it'll be removable, but it's got a ton of sealant holding it on. Plus, I'm going to cover the screw heads in sealant as well as all of the nutplates and exposed threads on the inside. So getting this cover off will be a real chore. Hopefully, it'll never have to happen. Here's a view of the inside as it stands now, without the sealant applied to the nutplates and screws:
That's as far as I got tonight. Somewhere on the 12th skin stiffener was the 7,000th rivet in the plane! What's left prior to rib installation in the skin is:
- two remaining skin stiffeners
- two T-1010 anti-rotation plates in the inboard aft rib
- one more tooling hole rivet
- fuel fill flange and vent line clip
10 Mar 2012
Still slowly progressing through the left fuel tank final assembly. Got all of the stiffeners installed as well as the fuel cap flange and all of the bits that rivet onto the aft inboard rib. Here's the fuel cap flange:
I think the outside looks great; all of the rivets came out well and the thin fillet of sealant between the skin and the flange is perfect. Here's a shot of the inside, showing the installed vent line clip and all of the sealant fillets and rivet head coverings:
There were numerous instances on all parts where I had made a fillet of sealant connecting the part to the skin, only to have a bubble pop in the sealant overnight and leave something that looked like this:
I can't be certain tha some of these voids won't allow leaks (and there were a couple on the aft inboard rib where I could see light coming through them, so obviously leaky there...). I had to go around and mark all of them, then hit them with a dab of sealant in the next batch. At this point I'm pretty sure that all of the bubbles in the stiffeners, aft inboard rib, and fuel cap flange have been taken care of. It's going to be hard to inspect for these once I get the ribs in, so I'm going to start using more sealant around the edges to guard against this.
Speaking of ribs, everything else was done so it was time to move on to the first of the ribs—the forward inboard rib. Here's a shot of it in progress, just after getting all of the rivets squeezed and starting to lay on the sealant:
Because this is an outer surface of the fuel tank, I put an extra huge coating of sealant on the holes at the forward bend in the rib. I also used quite a bit of sealant in the fillet on the inner surface. Here's the inner fillet:
Despite using tons of sealant along this edge, on both sides, I still managed to allow one of the holes to open up and require a touch-up.
Jeremy was avaialble early this afternoon so we set about installing the first full rib. It went pretty well, with no significant problems.
Between the pre-installationg cleaning of parts, the masking of the skin and rib, the mixing and distribution of sealant, the riveting, and all of the cleanup, installing this one part took about 2.5 hours. Only an hour of that was riveting. So the overhead on fuel tank assembly is pretty severe. Here's a picture of the other side of that rib with the very nice-looking fillet around the edge:
I'm going through paper towels and nitrile gloves at an astounding rate, but so far I'm pretty happy with my progress and feel reasonably confident that I won't have any leaks from the parts I've done thus far. Five more full-sized ribs and the aft half of the inboard rib to go...
23 Mar 2012
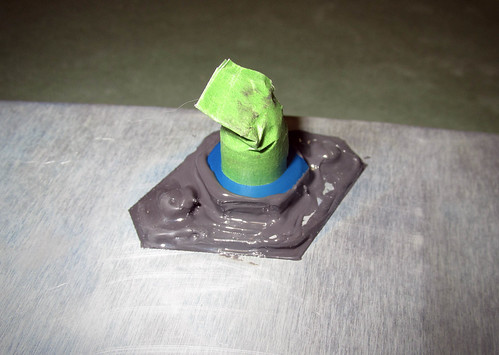
Getting help with bucking for the interior bits of the fuel tanks turns out to be difficult, so progress has been a lot slower than I'd hoped on the left fuel tank. I'm up to three of the five interior ribs done now. I had some spare Pro Seal on the rib that got done tonight so I used it to install the tank vent fitting and nut in the inboard rib. Here's how it looks on the outside:
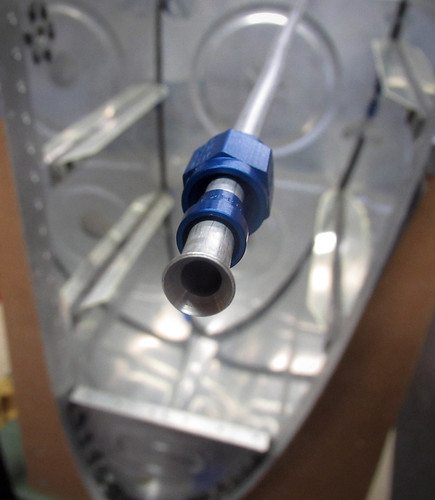
And here's how it looks on the inside:
The outer end of the fitting will be used to attach a manometer during the tank leak check, but otherwise will not be touched again until the wings are attached to the fuselage, which is a long way off.
The inner side of the fitting gets attached to the vent tube, so I went ahead and cut a piece of soft aluminum tubing to length, straightened it, and used my new flaring tool to give it a nice 37° flare. Here is the result:
Flaring is super easy and I was very happy with the results. This tube assembly now gets set aside until I've finished all of the tank ribs and the J-stiffener.
While waiting for shop assistance to be available for bucking the ribs, I've been finding a few other odds and ends to work on.
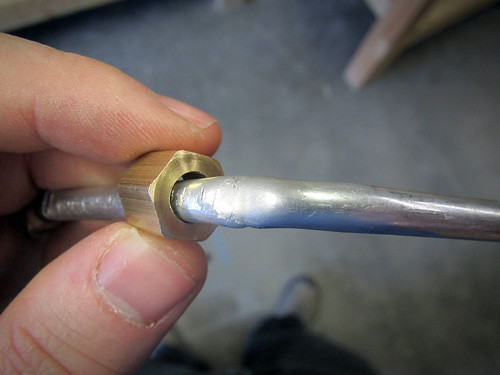
For starters, I finally figured out the right hardware to attach the Princeton capacitance fuel probes to the fueltank rib with. Why they don't ship with it is a mystery to me, but whatever. The answer is a brass 1/4" NPT compression fitting nut which McMaster Carr sells for under a dollar. For those familiar with compression fittings, note that you do not need the sleeve; just the nut. I did run into a problem with the fuel probe that I had already test-fit, because where I had bent it, it was now slightly larger in one dimension than 0.25" and the tolerance on the hole in the compression fitting nut is quite close.
The solution was just to drill out the hole in the nut to 0.29", which is what the widest part of the bends ended up being. I'm not counting on the compression fitting for a good seal (everything will be coated with Pro Seal on the inside anyway), so the added gap around the tubing when secured shouldn't be an issue. There's still plenty of shoulder on the nut to make tight against the fuel probe.
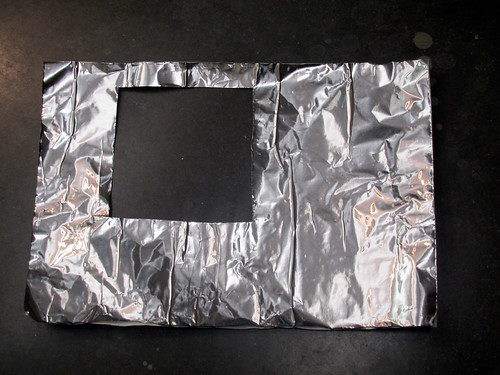
The next thing I did while waiting for rivet buckers was to add a bit of heat reflector to the inside of the skin around the landing light in the left leading edge. I started by ordering a 3' length of Van's self-adhesive heat reflector, which turns out just to be really wide aluminum tape. It comes in a 30" width, which is perfect because you want two 15" x 22" pieces for the two landing light bays. Without removing the backing, I laid the reflector piece in the bay and marked it where I needed to make a cutout for the landing light lens and attachment hardware. When this was removed, it looked like this:
Peeling the backing off all at once and trying to maneuver the very sticky aluminum into position seemed like a bad idea, so I just peeled off a bit and got it stuck up under the J-stiffener, then incrementally peeled off a bit more backing and rolling the tap into place. When it was all done, I used a wooden shim as a squeegee to flatten it out (mostly). Here's the result:
And when the landing light bracket and lens are put back in place, it looks like this:
Total time to install, about 20 minutes—most of which was futzing around trying to get the bracket screws back in place through the lens hole, which is a real pain.
Now I know that a heat reflector here probably isn't necessary; I've never heard of anyone having problems with paint discolorization or bubbling around their landing lights, but for $4 in materials and less than an hour to do both, I figured why not. I have only seen one other builder do any heat treatments for the landing light bay, and he did a high-temperature engine paint on the inside of the bay. I wanted mine to be slightly higher utility and figured that the highly-reflective aluminum will end up with slightly more light getting out the lens... so maybe that's a win? Whatever.
30 Mar 2012
I had bronchitis there for a week or so, and as a result not a lot of work got done. But a few things did happen here and there.
For one thing, I did manage to get all of the ribs installed in the left fuel tank:
I ended up doing a couple passes of touch-ups with Pro Seal to make sure there weren't any bubbles or pinholes in the fillets around the ribs, so I'm reasonably confident at this point that there won't be any leaks from the rivets I've put in thus far.
I got Jeremy to help me put the J-stiffener in as well. It was somewhat of a challenge to do the forward fillet behind the curl of the stiffener. I ended up just putting a blob of sealant on my (gloved) finger and sticking it up underneath the stiffener. Then I'd go back with a popsicle stick and try to smooth it out, blind. Finally, I'd have a look with a mirror and a flashlight to see how I did. I probably went a bit heavy with the sealant here which made it a lot easier. Here's a shot of the inboard bay with the J-stiffener installed.
Also visible is the installed vent tube. This was trivial to do, since it just involves 6 snap bushings and the already-fabricated tube. The hand-bend in the outboard bay to line up with the vent clip was trivial, and I expect the bend in the inboard bay to line up with the bulkhead union to be similarly easy. Once I get the inboard aft rib installed, I'll hit each of the snap bushing/tube/rib intersections with a bit of Pro Seal to keep it from vibrating around too much.
The whole reason I put aside the work on the main body of the wing and started assembling this fuel tank was because it was cold out and I wanted to do the chemistry phase of the main body work outside if I could. This weekend's forecast is for great weather and warm temps, so I may shelve the fuel tank for awhile and go back to working on the rest of the wing.
| <-- February 2012 | April 2012 --> |