
| Workshop | Empennage | Wings | Fuselage | Contact |
| <-- September 2010 | November 2010 --> |
Chronological Updates, October, 2010
17 Oct 2010
It's going to be another slow month on the RV-10 front; I've been out of town for most of it thus far, and I'm going to Tanzania here before too long.
I did find time this weekend to put a little work into the vertical stabilizer tip fairing. The first thing I did was to clamp the VS to my workbench, then hang the rudder on it using my temporary attachment pins. Oddly, the center hinge rod end bearing did not line up (it needs to come out about 1/2 turn) despite the center pin dropping right in without effort when these two parts were last joined (during the full empennage attachment out in the driveway). Best guess is that the way the VS is clamped to the bench has introduced a bit of warp to it. Anyway it has no real bearing on what I'm doing right now anyway, so I'll just leave it and adjust as necessary next time I have the full tail assembled (probably a long ways off).
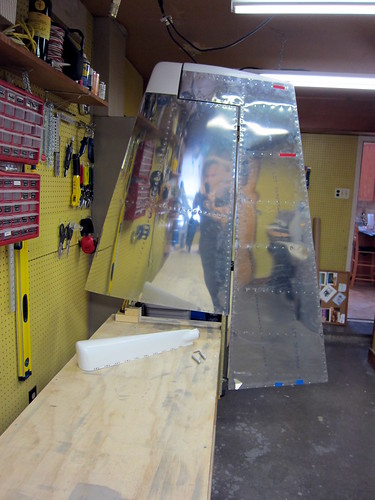
The tip fairing does not stick out aft of the forward top flange of the vertical stabilizer, so no trimming was necessary there. In fact, if anything, it's a bit short and could stand to be built-up a bit. Not a problem, considering that I have to build up the entire aft face of the fairing anyway. I'll leave that for later. Also, the top of the VS fairing is about 3/16" shorter than the top of the rudder fairing. I may build that up if I'm feeling supremely anal later in the build process, or if I run out of money to buy more parts and just want something to do. For now, I'm OK with it. Besides, if I build a forward-facing camera into the top of the VS tip fairing, I'll end up modifying the top edge anyway. So that's probably the right time to worry about the discrepancy.
I made quick work of match-drilling the fairing to the vertical stabilizer, then set about deviating from the plans. The plans call for the use of eight blind rivets to hold the fairing on. I want mine to be removable to be able to access the camera and/or any antennas/lights I may put up there. So I need nutplates. I used basically the same procedure that I had previously done with the bottom rudder fairing.
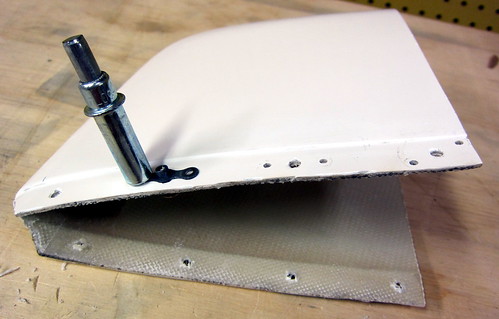
What were to be #30 rivet holes were drilled out to #21, and #40 holes were added to either side of each to make room for the nutplate rivets. The aft-most hole on each side is too close to the aft edge of the fiberglass, so the nutplate couldn't be mounted horizontal. I could have ordered some one-lug #6 nutplates for this, but it works just as well tilting these corner nutplates to an angle. The two rivets are close to the edge, but it wasn't a problem and I didn't end up with any cracking (except for some hairlines in the gelcoat). Because of the flange lip on the fiberglass, all of the countersinking had to be done with a bare bit and no cage, but this wasn't an issue; it just took a bit longer and required a bit more attention to detail.
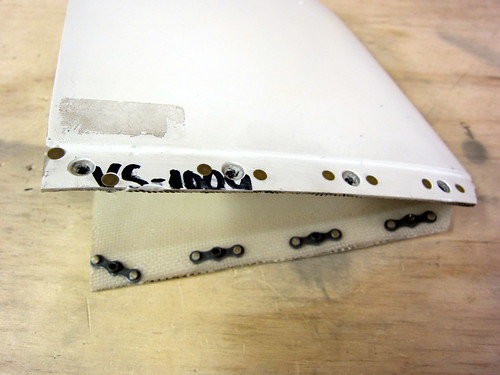
Riveting the nutplates on went without a hitch. The VS tip fairing is now ready for the wet fiberglass work on the aft face, and that is going to be tabled until I'm ready to do all of my fiberglass work, or at least until I'm ready to work on the wingtips. So for now I'm done with the empennage fairings chapter and ready to get to work on the wings. The kit should arrive shortly after I get back from Africa.
It's going to be another slow month on the RV-10 front; I've been out of town for most of it thus far, and I'm going to Tanzania here before too long.
I did find time this weekend to put a little work into the vertical stabilizer tip fairing. The first thing I did was to clamp the VS to my workbench, then hang the rudder on it using my temporary attachment pins. Oddly, the center hinge rod end bearing did not line up (it needs to come out about 1/2 turn) despite the center pin dropping right in without effort when these two parts were last joined (during the full empennage attachment out in the driveway). Best guess is that the way the VS is clamped to the bench has introduced a bit of warp to it. Anyway it has no real bearing on what I'm doing right now anyway, so I'll just leave it and adjust as necessary next time I have the full tail assembled (probably a long ways off).
The tip fairing does not stick out aft of the forward top flange of the vertical stabilizer, so no trimming was necessary there. In fact, if anything, it's a bit short and could stand to be built-up a bit. Not a problem, considering that I have to build up the entire aft face of the fairing anyway. I'll leave that for later. Also, the top of the VS fairing is about 3/16" shorter than the top of the rudder fairing. I may build that up if I'm feeling supremely anal later in the build process, or if I run out of money to buy more parts and just want something to do. For now, I'm OK with it. Besides, if I build a forward-facing camera into the top of the VS tip fairing, I'll end up modifying the top edge anyway. So that's probably the right time to worry about the discrepancy.
I made quick work of match-drilling the fairing to the vertical stabilizer, then set about deviating from the plans. The plans call for the use of eight blind rivets to hold the fairing on. I want mine to be removable to be able to access the camera and/or any antennas/lights I may put up there. So I need nutplates. I used basically the same procedure that I had previously done with the bottom rudder fairing.
What were to be #30 rivet holes were drilled out to #21, and #40 holes were added to either side of each to make room for the nutplate rivets. The aft-most hole on each side is too close to the aft edge of the fiberglass, so the nutplate couldn't be mounted horizontal. I could have ordered some one-lug #6 nutplates for this, but it works just as well tilting these corner nutplates to an angle. The two rivets are close to the edge, but it wasn't a problem and I didn't end up with any cracking (except for some hairlines in the gelcoat). Because of the flange lip on the fiberglass, all of the countersinking had to be done with a bare bit and no cage, but this wasn't an issue; it just took a bit longer and required a bit more attention to detail.
Riveting the nutplates on went without a hitch. The VS tip fairing is now ready for the wet fiberglass work on the aft face, and that is going to be tabled until I'm ready to do all of my fiberglass work, or at least until I'm ready to work on the wingtips. So for now I'm done with the empennage fairings chapter and ready to get to work on the wings. The kit should arrive shortly after I get back from Africa.
| <-- September 2010 | November 2010 --> |