
| Workshop | Empennage | Wings | Fuselage | Contact |
Planning and Workshop Preparation
My house was originally built with a 2-car garage. At some point, someone built
a wall down the middle and turned one half into a shop. They removed the
roll-up door from the shop side and replaced it with a regular door and a
window. The shope is great; the fact that it has only a small door may come
to haunt me. This project would be much more convenient in a space the size
of a two car garage, though I must say the heating, lighting, and built-in
storage for tools and supplies in the shop will be quite welcome.
Prior to the RV-10 idea being planted in my head, I had improved the shop with four pairs of 48" flourescent lights, an ethernet jack, and a healthy dose of normal shop tools and bench-top power tools. For most of the three years that I've lived in this house, the shop has been under-utilized. Partly this is because it was used as a storage room for a bunch of random stuff. The RV-10 project served as an impetus to finally clear out the junk and return the shop to working order.
In addition to making space to work, I built a pair of EAA-1000 standard workbenches (60"x24"x33") and outfitted the shop with a complete set of sheet metal tools (the complete RV kit from Isham). In order to use the air tools that come with that kit, I also bought a good compressor—the Campbell-Hausfeld VT6271. This compressor requires a 220V single-phase outlet, so I installed one in the garage. There are several advantages to installing the outlet in the garage rather than the shop. For starters, I don't have a lot of space in the shop, so not taking any up with a big compressor is a win. Also, I won't have to listen to the compressor as much when I'm working (the wall between is well insulated). I did have to drill a hole in the shop ceiling and another in the garage ceiling to pass a compressed air hose through the attic. It turned out being a pretty tight installation that I'm very happy with.
The small workshop should suffice for building and storing most of the empennage components. Unfortunately, the tailcone is too wide (by two inches) to fit out the door. While all of the work except final riveting can be done in the shop, the tailcone final assembly and storage will have to take place in the garage.
The wings I can also build in the shop. I'll build the flaps, ailerons, and fuel tanks in pairs, but the main wing bodies will have to be done serially because there isn't enough space to work on both at the same time. The completed wings also cannot be stored in the shop; they'll have to be moved next door into the garage.
As for the fuselage, it is definitely too big to fit through the door to the shop. I can build some of the sub-assemblies in the shop, but the connection of the sub-asemblies will have to be done in the garage. At that point, primary construction will have to be shifted to the garage. This will require some significant changes. For one thing, the garage has almost no light whatesoever. Also I'll have to fix the garage door so that mice can't get in anymore. The workbenches will move into the garage, the wings on their storage rack will take the place of the workbenches in the shop.
The fuselage with tail cone attached (but without the motor mount) will fit in my garage with 15" to spare, making a pretty tight fit. Working on it inside the garage will be a pain, but doable. The garage door is high enough and wide enough that I can roll the plane out the door on its main gear and with the canopy in place. However, I can't get the nose gear on without the motor mount—and the motor mount plus fuselage and tail cone is too long for the garage. Likely, when the time comes, I'll open the garage door, put on the motor mount and front landing gear, weight the front down so that it doesn't do a wheelie, and then have a towing company move it to a hanger space all in one day.
Purchased a truckload of lumber, tools, and supplies today during my lunchbreak which will result in the production of two EAA-1000 standard workbenches as well as some assorted things which will come in handy during the build of the RV-10. Most significantly, a 6" grinding wheel, a HVLP paint sprayer, and the hardware needed to put a 220V outlet in my garage for the compressor.
In the evening I cut all the lumber for the workbenches and started assembling the first one. My ability to screw 2x4s together and have it all be square is somewhat lacking, but I managed to put together the top of one workbench that didn't look too bad.
15 Sep 2009
Ordered my sheet metal tools! Chose planetools.com for this; their kit seemed the best and their prices were good. Got their full RV tool kit (which includes the DRDT-2 and pneumatic squeezer) with several upgrades: the swivel flush set, longerone yoke, 4" thin-nose yoke w/ set holder and spring, professional tight-fit drill kit, double drill bits, extra clecos, adjustable set holder, and an upgraded 3X rivet gun. In addition to the kit, I bought a set of aviation safety wire pliers and a torque wrench.
This was my first big purchase for the RV-10, and the only major purchase during the planning and workshop preparation stage of the project. The next major purchase will be the empannage kit!
Also purchased some Alumiprep, Alodine, and Akzo primer from Aircraft Spruce. Props to Aircraft Spruce for shipping same day!
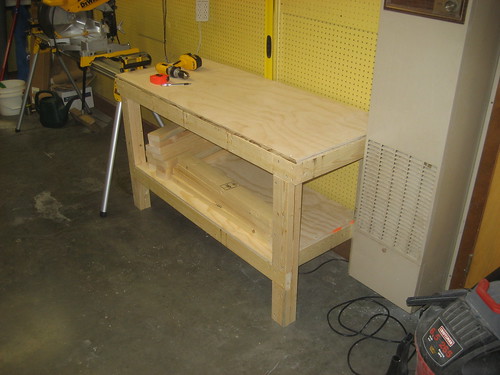
After work and handball I finished the first of the workbenches:

17 Sep 2009
Faxed off my order form for the empennage kit this morning!! Soon I'll actually be building an airplane instead of just thinking about it. :)
Also ordered a number of accessories from Van's, including an access panel and doubler (VA-195C & D) for the rudder trim, some NACA inlets to put in the tailcone in support of the overhead console vents, some nylon conduit, 18 gauge wire, and the practice toolbox and control surface practice kits so I can learn to use my rivet gun without ruining much of the actual plane.
I've got a bit more work to do before I can start really working; I still need to clear out some junk out of the garage and shop to make room for everything, and I need to wire up the 220V outlet in the garage so I can use the compressor. Speaking of which, there's still a number of items on order that I'm waiting on.
Very excited!
Update: Managed to max out my credit card by accident! Too many plane parts orders in one day! Of all the stuff I bought today and yesterday, three of my orders (including the emp kit from Van's and my compressor) were declined by Visa. Paid off the card so it has zero balance now, hopefully everything will go through successfully tomorrow. :) Oops!
Also managed to put together the second workbench tonight. Took a timelapse video of the process:
22 Sep 2009
Today I received six packages from Aircraft Spruce, Mouser Electronics, Amazon, Klein Tools, and Isham Inc. These included all of the parts for my rudder trim modification, some connectors and wire crimping supplies for the V.S. and rudder wiring, a water/oil remover for my compressed air system, and almost all of the tools I'll need for this project. The only major tools still to arrive are the DRD2 dimpler and the air compressor itself.
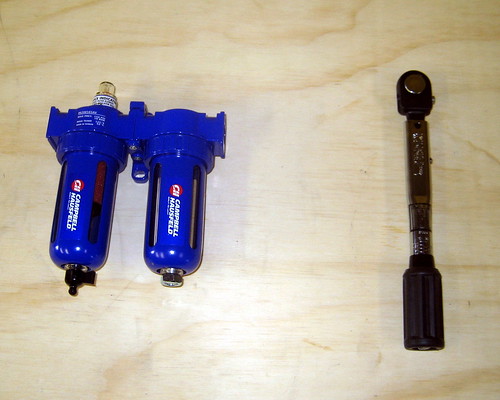
When I got home from work, only two small boxes were waiting. Opening revealed the air cleaner and torque wrench:
Shortly after this picture was taken, everything else showed up:
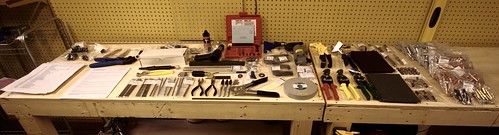
It took awhile to inventory everything, make sure all the parts were there, and figure out where to store all these tools. But it's all done now and the shop is almost ready for full-on RV building.
23 Sep 2009
Got a call from a freight company today telling me that my compressor had arrived in Albuquerque and asking if tomorrow would be a good time to drop it off. They only come up to Los Alamos once a week, so I said, "absolutely!"
In preparation for the arrival of the compressor, I spent the evening wiring up a 220V single-phase outlet in my garage. The only snag I ran into was the two-pole 20A breaker I purchased last week turned out not to fit my panel, despite being the right brand. Apparently I needed the squareD "HOM" version, not the squareD whatever version I got at Lowes. A quick trip to the hardware store in White rock determined that they had none, but a slightly longer trip to Los Alamos proper rendered the correct breaker for the grand sum of $12. With that problem solved, the remainder of the install went smoothly.
24 Sep 2009
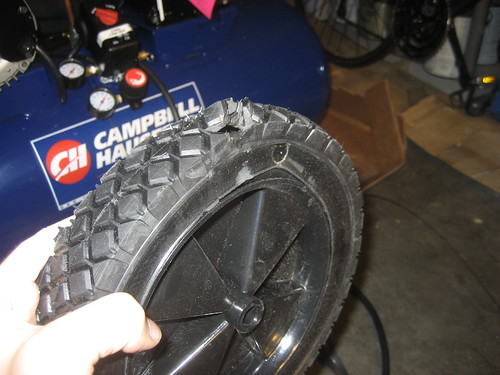
A big day for big tools. First to arrive was my compressor.
The box looked like it was in good shape; unfortunately there were some problems inside. One of the wheels, which are shipped loose sitting beneath the compressor, had gotten lodged beneath the tank drain valve, which had subsequently torn a hole in the tire and dislodged the tire from the wheel.
The belt guard appears to have taken a good hit; the upper screw mount had torn out of the plastic and there was a big crack in the plastic.

Finally, there was no handle. That piece is supposed to be separate from the main compressor body during shipment, and it simply wasn't in the box at all. I got on the phone with the company I purchased the compressor from and they were really great about it; they immediately gave me a refund for a bit more than the cost of the missing/broken parts, and hooked me up with a rush order for the new bits.
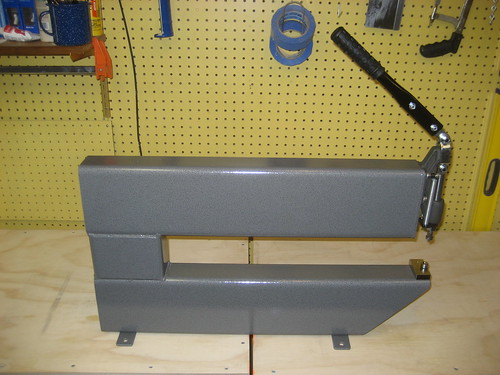
As I was finishing up with that ordeal, FedEx showed up with my DRDT-2 dimpler! It's huge! It was a breeze to assemble.
That's it for tools; I have everything I need (aside from running air hose into the shop from the garage)! Now if Van's would just ship the emp kit... I'd be off and running!
27 Sep 2009
I spent some time over the last couple days getting the compressor oiled, started, and burned-in. It seems to be working very well. Today I went down to Lowes and purchased the air lines and accessories needed to plumb a compressed air line into the shop. I included a filter/dryer system in-line so that the resulting air would be sufficiently dry and clean for doing primer and paint work. I also added a retractable 50' reel up near the ceiling of the shop so that I could pull an air line to anywhere in the room, but not have it be in the way when I wasn't using it.
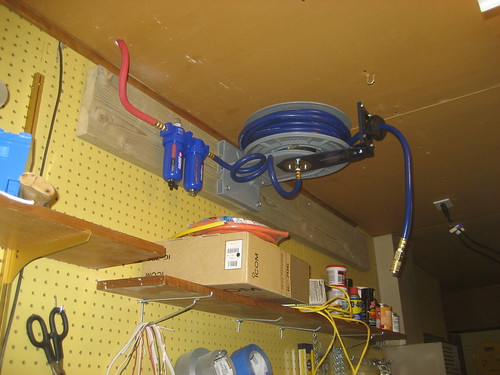
I'm really happy with how the installation turned out; until I need to do air work in the garage, this should be sufficient. I went ahead and put a quick disconnect right at the compressor output, so switching to garage work will really just be a matter of buying another hose and possibly a second air cleaning system for that room. I could also add a T manifold to the output of the compressor so I can supply both rooms at once, if neccessary.
Prior to the RV-10 idea being planted in my head, I had improved the shop with four pairs of 48" flourescent lights, an ethernet jack, and a healthy dose of normal shop tools and bench-top power tools. For most of the three years that I've lived in this house, the shop has been under-utilized. Partly this is because it was used as a storage room for a bunch of random stuff. The RV-10 project served as an impetus to finally clear out the junk and return the shop to working order.
In addition to making space to work, I built a pair of EAA-1000 standard workbenches (60"x24"x33") and outfitted the shop with a complete set of sheet metal tools (the complete RV kit from Isham). In order to use the air tools that come with that kit, I also bought a good compressor—the Campbell-Hausfeld VT6271. This compressor requires a 220V single-phase outlet, so I installed one in the garage. There are several advantages to installing the outlet in the garage rather than the shop. For starters, I don't have a lot of space in the shop, so not taking any up with a big compressor is a win. Also, I won't have to listen to the compressor as much when I'm working (the wall between is well insulated). I did have to drill a hole in the shop ceiling and another in the garage ceiling to pass a compressed air hose through the attic. It turned out being a pretty tight installation that I'm very happy with.
The small workshop should suffice for building and storing most of the empennage components. Unfortunately, the tailcone is too wide (by two inches) to fit out the door. While all of the work except final riveting can be done in the shop, the tailcone final assembly and storage will have to take place in the garage.
The wings I can also build in the shop. I'll build the flaps, ailerons, and fuel tanks in pairs, but the main wing bodies will have to be done serially because there isn't enough space to work on both at the same time. The completed wings also cannot be stored in the shop; they'll have to be moved next door into the garage.
As for the fuselage, it is definitely too big to fit through the door to the shop. I can build some of the sub-assemblies in the shop, but the connection of the sub-asemblies will have to be done in the garage. At that point, primary construction will have to be shifted to the garage. This will require some significant changes. For one thing, the garage has almost no light whatesoever. Also I'll have to fix the garage door so that mice can't get in anymore. The workbenches will move into the garage, the wings on their storage rack will take the place of the workbenches in the shop.
The fuselage with tail cone attached (but without the motor mount) will fit in my garage with 15" to spare, making a pretty tight fit. Working on it inside the garage will be a pain, but doable. The garage door is high enough and wide enough that I can roll the plane out the door on its main gear and with the canopy in place. However, I can't get the nose gear on without the motor mount—and the motor mount plus fuselage and tail cone is too long for the garage. Likely, when the time comes, I'll open the garage door, put on the motor mount and front landing gear, weight the front down so that it doesn't do a wheelie, and then have a towing company move it to a hanger space all in one day.
Updates regarding the workshop
14 Sep 2009Purchased a truckload of lumber, tools, and supplies today during my lunchbreak which will result in the production of two EAA-1000 standard workbenches as well as some assorted things which will come in handy during the build of the RV-10. Most significantly, a 6" grinding wheel, a HVLP paint sprayer, and the hardware needed to put a 220V outlet in my garage for the compressor.
In the evening I cut all the lumber for the workbenches and started assembling the first one. My ability to screw 2x4s together and have it all be square is somewhat lacking, but I managed to put together the top of one workbench that didn't look too bad.
15 Sep 2009
Ordered my sheet metal tools! Chose planetools.com for this; their kit seemed the best and their prices were good. Got their full RV tool kit (which includes the DRDT-2 and pneumatic squeezer) with several upgrades: the swivel flush set, longerone yoke, 4" thin-nose yoke w/ set holder and spring, professional tight-fit drill kit, double drill bits, extra clecos, adjustable set holder, and an upgraded 3X rivet gun. In addition to the kit, I bought a set of aviation safety wire pliers and a torque wrench.
This was my first big purchase for the RV-10, and the only major purchase during the planning and workshop preparation stage of the project. The next major purchase will be the empannage kit!
Also purchased some Alumiprep, Alodine, and Akzo primer from Aircraft Spruce. Props to Aircraft Spruce for shipping same day!
After work and handball I finished the first of the workbenches:
17 Sep 2009
Faxed off my order form for the empennage kit this morning!! Soon I'll actually be building an airplane instead of just thinking about it. :)
Also ordered a number of accessories from Van's, including an access panel and doubler (VA-195C & D) for the rudder trim, some NACA inlets to put in the tailcone in support of the overhead console vents, some nylon conduit, 18 gauge wire, and the practice toolbox and control surface practice kits so I can learn to use my rivet gun without ruining much of the actual plane.
I've got a bit more work to do before I can start really working; I still need to clear out some junk out of the garage and shop to make room for everything, and I need to wire up the 220V outlet in the garage so I can use the compressor. Speaking of which, there's still a number of items on order that I'm waiting on.
Very excited!
Update: Managed to max out my credit card by accident! Too many plane parts orders in one day! Of all the stuff I bought today and yesterday, three of my orders (including the emp kit from Van's and my compressor) were declined by Visa. Paid off the card so it has zero balance now, hopefully everything will go through successfully tomorrow. :) Oops!
Also managed to put together the second workbench tonight. Took a timelapse video of the process:
22 Sep 2009
Today I received six packages from Aircraft Spruce, Mouser Electronics, Amazon, Klein Tools, and Isham Inc. These included all of the parts for my rudder trim modification, some connectors and wire crimping supplies for the V.S. and rudder wiring, a water/oil remover for my compressed air system, and almost all of the tools I'll need for this project. The only major tools still to arrive are the DRD2 dimpler and the air compressor itself.
When I got home from work, only two small boxes were waiting. Opening revealed the air cleaner and torque wrench:
Shortly after this picture was taken, everything else showed up:
It took awhile to inventory everything, make sure all the parts were there, and figure out where to store all these tools. But it's all done now and the shop is almost ready for full-on RV building.
23 Sep 2009
Got a call from a freight company today telling me that my compressor had arrived in Albuquerque and asking if tomorrow would be a good time to drop it off. They only come up to Los Alamos once a week, so I said, "absolutely!"
In preparation for the arrival of the compressor, I spent the evening wiring up a 220V single-phase outlet in my garage. The only snag I ran into was the two-pole 20A breaker I purchased last week turned out not to fit my panel, despite being the right brand. Apparently I needed the squareD "HOM" version, not the squareD whatever version I got at Lowes. A quick trip to the hardware store in White rock determined that they had none, but a slightly longer trip to Los Alamos proper rendered the correct breaker for the grand sum of $12. With that problem solved, the remainder of the install went smoothly.
24 Sep 2009
A big day for big tools. First to arrive was my compressor.
The box looked like it was in good shape; unfortunately there were some problems inside. One of the wheels, which are shipped loose sitting beneath the compressor, had gotten lodged beneath the tank drain valve, which had subsequently torn a hole in the tire and dislodged the tire from the wheel.
The belt guard appears to have taken a good hit; the upper screw mount had torn out of the plastic and there was a big crack in the plastic.
Finally, there was no handle. That piece is supposed to be separate from the main compressor body during shipment, and it simply wasn't in the box at all. I got on the phone with the company I purchased the compressor from and they were really great about it; they immediately gave me a refund for a bit more than the cost of the missing/broken parts, and hooked me up with a rush order for the new bits.
As I was finishing up with that ordeal, FedEx showed up with my DRDT-2 dimpler! It's huge! It was a breeze to assemble.
That's it for tools; I have everything I need (aside from running air hose into the shop from the garage)! Now if Van's would just ship the emp kit... I'd be off and running!
27 Sep 2009
I spent some time over the last couple days getting the compressor oiled, started, and burned-in. It seems to be working very well. Today I went down to Lowes and purchased the air lines and accessories needed to plumb a compressed air line into the shop. I included a filter/dryer system in-line so that the resulting air would be sufficiently dry and clean for doing primer and paint work. I also added a retractable 50' reel up near the ceiling of the shop so that I could pull an air line to anywhere in the room, but not have it be in the way when I wasn't using it.
I'm really happy with how the installation turned out; until I need to do air work in the garage, this should be sufficient. I went ahead and put a quick disconnect right at the compressor output, so switching to garage work will really just be a matter of buying another hose and possibly a second air cleaning system for that room. I could also add a T manifold to the output of the compressor so I can supply both rooms at once, if neccessary.